How to drastically reduce the cost on Google BigQuery by carefully choosing your data types

Google sales his Big Query based on a Pay by Use business model.

I assume that you will use big Query for what it is designed for, I mean a lot of data (billions of lines) reads several times a day during batches, calculation, aggregation or reports reads

As you pay by use, you need to pay attention to the types you are going to use.

For example, to store numbers Google will invite you to use NUMERIC types.

Let’s dive in the Google documentation: you have 3 types of numerics

  • NUMERIC: 16 bytes
  • FLOAT64: 8 bytes
  • INT64: 8 bytes

I made a POC about two different types in order to check about elapsed time, IOs and CPU consumption

  • I created 2 tables with a payment amount column (PAYMENT_AMT)
  • In F_SALES_TRX_LINE_PAYMENT_LOAD_ETL_TYPES table I defined it as a FLOAT64
  • In F_SALES_TRX_LINE_PAYMENT_LOAD_ETL table I defined it as a NUMERIC
  • I loaded the table with the exact same data and the same number of records

Here is the result!

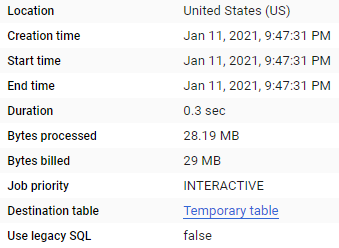
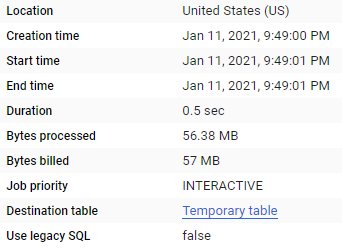
Comparing the duration

FLOAT64 Type

select   sum(PAYMENT_AMT)
from ade_test.F_SALES_TRX_LINE_PAYMENT_LOAD_ETL_TYPES;
-- 1.4466987007999676E8

NUMERIC Type

select   sum(PAYMENT_AMT)
from ade_test.F_SALES_TRX_LINE_PAYMENT_LOAD_ETL
--144669870.08

Duration analysis

Duration is almost the double for Numeric (258 – 153)

Money costs

FLOAT Type costs

NUMERIC Type costs

Google will charge the double amount to perform the same calculation and obtain the exact same result.

57Mb will be charged for NUMERIC, vs 29Mb for FLOAT64

About Precision

Naturally losing precision on operations

Float implies some differences according to  IEEE.
If you execute

SELECT 
4.35 * 100 a_float
, CAST(4.35 AS NUMERIC) * 100 a_numeric

You will obtain

Workaround

A good workaround that will not imply any cost if to ROUND the float

Just put the right precision within the ROUND function

SELECT
4.35 * 100 Regular_Float
, ROUND(4.35 * 100) Rounded_float
, CAST(4.35 AS NUMERIC) * 100 Regular_numeric

SELECT
(4.35 * 9.3  )* 100 Regular_Float
, ROUND((4.35 *9.3  ) * 100) Rounded_float
, ROUND( ((4.35 *9.3  ) * 100) ,2 ) Rounded_float_2
, CAST((4.35 *9.3 ) AS NUMERIC) * 100 Regular_numeric


Conclusion

By choosing the right data types, you will

  • Drastically reduce the cost on your Google invoice
  • Make your queries faster
  • And participate in saving the planet 😉

Getting the population of a table partitioned by date

When you have to troubleshoot some queries, it’s always interesting to get the population of a table by partition. We all know the query that gives you the count by partition number

SELECT 
    PARTITION, 
    COUNT(*) 
FROM 
    BASE.TABLE 
GROUP BY PARTITION 
ORDER BY PARTITION ASC

Here is a query that will return the count with the actual ranges defined

Table DDL

CREATE MULTISET TABLE BASE.TABLE1 ,NO FALLBACK ,
     NO BEFORE JOURNAL,
     NO AFTER JOURNAL,
     CHECKSUM = DEFAULT,
     DEFAULT MERGEBLOCKRATIO
     (
      TABLE_ID VARCHAR(32) CHARACTER SET LATIN NOT CASESPECIFIC NOT NULL,
      CONTACT_KEY VARCHAR(250) CHARACTER SET LATIN NOT CASESPECIFIC NOT NULL,
      SEND_DT DATE FORMAT 'YYYY-MM-DD'
      )
PRIMARY INDEX PI_A_ECRM_SEND (TABLE_ID, SEND_DT )
PARTITION BY RANGE_N(SEND_DT  BETWEEN DATE '2015-11-30' AND DATE '2019-02-17' EACH INTERVAL '7' DAY , NO RANGE,UNKNOWN);

Query to get the population of Ranges with the defined ranges

LOCKING BASE.TABLE1 FOR ACCESS
SELECT
    PARTITION AS PARTITION_NUMBER,
    MIN(SEND_DT) AS RANGE_LOW,
    MAX(SEND_DT) AS RANGE_HIGH,
    COUNT(*) AS POPULATION
FROM BASE.TABLE1
GROUP BY PARTITION
ORDER BY PARTITION ASC

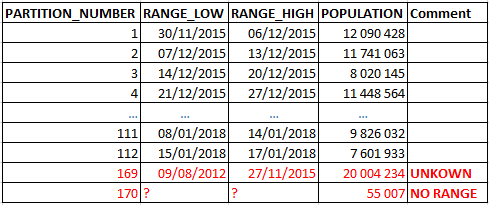
Displaying the result

You clearly also get the UNKNOW and NO RANGE Partitions

Using QueryGrid 1.0 to refresh remote Teradata system data

Overview

I lately had to refresh a dev environment with some Prod data (of course consistent and fresh) in order to test a webservice in development environment (From Teradata To Teradata)

I decided to use QueryGrid 1.0 that was deployed on the Teradata systems

About environment:

  • Production system is built with 3 nodes
  • Development system is built with 2 nodes

This is important to know because it will affect the number of concurrentstreams per node you can open between the 2 systems

Choose a value between 1 to 5 (depending on the concuurent jobs). Higher the number is, faster will be the data exchange between the two systems

In this case:

  • you can write clearly in the foreign server creation by applying the instruction

concurrentstreams (2 )

  • Or let it depend on the session by applying a queryband
SET QUERY_BAND = 'concurrentstreams=2;' FOR SESSION;

Steps to follow on the Production Teradata System

CREATE USER PROXY_USER AS PERM=0 PASSWORD=********;

Proxy User creation and trusted authorization

CREATE AUTHORIZATION td_server_db.PROXY_USER_auth AS DEFINER TRUSTED USER 'PROXY_USER' PASSWORD '********';

Create foreign server on production system

This Foreign server will point to the Development server composed by 2 nodes

CREATE FOREIGN SERVER TD_SERVER_DB.DEV 
EXTERNAL SECURITY DEFINER TRUSTED PROXY_USER_auth USING 
Hosttype('Teradata')
remotehost('xxxxcop1,xxxxcop2')
ip_device('bond0')
port('5000')
read_timeout(2000)
listen_timeout(600)
concurrentstreams(2)
DO IMPORT WITH SYSLIB.LOAD_FROM_TD,
DO EXPORT WITH SYSLIB.LOAD_TO_TD;

Applicative account creation

CREATE USER "APP_BATCH" FROM "Comptes"
AS PERM = 0
PASSWORD = "********"
STARTUP = ''
NO FALLBACK
NO BEFORE JOURNAL
NO AFTER JOURNAL
PROFILE="BATCH"
DEFAULT ROLE=ALL

Grant read rights on source database

GRANT SELECT ON DBNAME TO APP_BATCH;

Grant connect through rights to applicative account

GRANT CONNECT THROUGH PROXY_USER TO PERMANENT APP_BATCH WITHOUT ROLE;

Grant right on DEV to the user

GRANT SELECT ON TD_SERVER_DB.DEV TO APP_BATCH;

Refresh Data from Prod to DEV

INSERT INTO
	DBNAME.TBLENAME
SELECT * FROM DBNAME.TBLENAME

Error at Foreign server creation

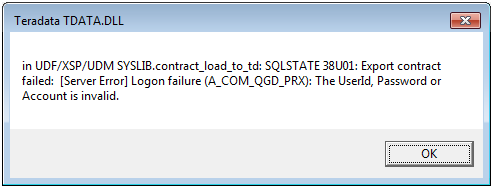
Each time I was trying to execute the create foreign server script I had the message above.

I solved the problem by droping / recreating the account and paying attention the the password: no ? in the password!!!

DROP
					USER
					PROXY_USER;
					
CREATE
					USER
					PROXY_USER
					FROM
					"Comptes"
					AS
					PERM=0
					PASSWORD="********"
				

Select failed

The user doesn’t have SELECT access to TD_SERVER_DB.DEV

GRANT
					SELECT
					ON
					TD_SERVER_DB.DEV
					TO
					APP_BATCH;
				

Insert failed

The user doesn’t have INSERT access to TD_SERVER_DB.DEV

GRANT
					INSERT
					ON
					TD_SERVER_DB.DEV
					TO
					APP_BATCH;
				

Steps to follow on the Development Teradata System

Create an applicative account

CREATE
				USER
				"APP_BATCH"
				FROM
				"PRE_Comptes"
				
AS
				PERM
				=
				0
				
PASSWORD
				=
				"*********"
				
STARTUP
				=
				''
				
NO
				FALLBACK
				
NO
				BEFORE
				JOURNAL
				
NO
				AFTER
				JOURNAL
				
PROFILE="BATCH"
				
DEFAULT
				ROLE=ALL
			

Proxy User creation and trusted authorization

CREATE
USER
PROXY_USER
AS
PERM=0
PASSWORD=********

CREATE
					AUTHORIZATION
					td_server_db.PROXY_USER_auth
					AS
					DEFINER
					TRUSTED
					USER
					'PROXY_USER'
					PASSWORD
					'********';
				

Grant the write rights on destination database

GRANT
					SELECT, INSERT, UPDATE, DELETE
					ON
					DBNAME
					TO
					APP_BATCH
				

Grant connect through rights to applicative account

GRANT
					CONNECT
					THROUGH
					PROXY_USER
					TO
					PERMANENT
					APP_BATCH
					WITHOUT
					ROLE;
				

Querying your remote DEV system from Prod system

  • In SQL Assistant, Log on the Production system with your applicative account (APP_BATCH)
  • Launch the following query
SELECT
				COUNT(*) FROM
				DBNAME.W_DBNAME_WS_120R@DEV
			
  • Launch an insert query in order to refresh the DEV data with Prod Data
INSERT
				INTO
				DBNAME.W_DBNAME_WS_120R@DEV
				
SELECT
				*
				FROM
				DBNAME.W_DBNAME_WS_120R
			

Checking the configuration on the Prod environment

SELECT
				
NameInfo,
ServerName, 
CAST(ValueInfo
				AS
				VARCHAR(100)) AS
				ValueInfo
				
FROM
				dbc.serverInfoV
				
WHERE
				ServerName='DEV';
			

Hosttype    DEV    ‘Teradata’

remotehost    DEV    ‘xxxxcop1,xxxxcop2’

ip_device    DEV    ‘bond0’

port    DEV    ‘5000’

read_timeout    DEV    2000

listen_timeout    DEV    600

concurrentstreams    DEV    2

Making Teradata work with Active Directory

The company you are working for could ask you to integrate Teradata system to their LDAP. Most of companies use Active Directory.

If LDAP integration is explained in some documentation, you will find less usefull information about Active Directory integration.

Here is an example from A to Z: hurry Go!

Windows parameters

DNS Settings

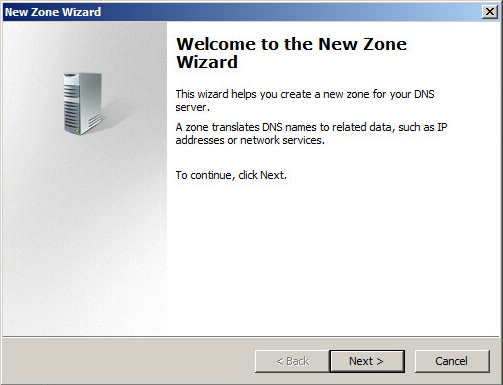
  • Click Start / Administrative Tools / DNS
  • Right-click on Reverse Lookup Zones
  • Click New Zone

  • Click Next

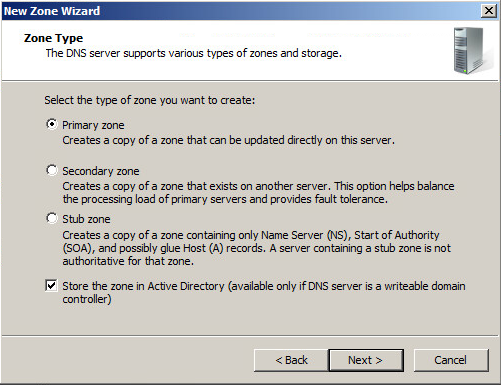
  • Check Primary zone
  • Check Store the zone in Active Directory
  • Click Next

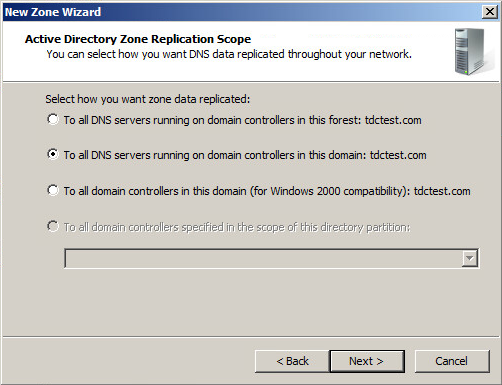
  • Check To all DNS servers running on domain controllers in this domain
  • Click Next

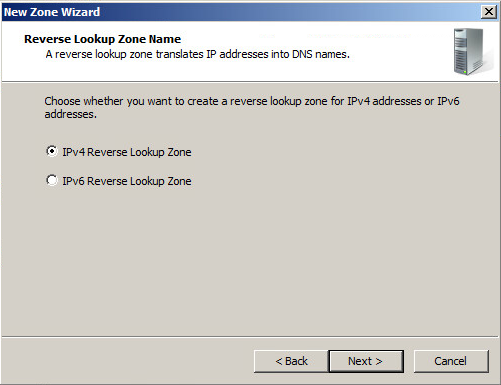
  • Check IPv4 Reverse Lookup Zone
  • Click Next

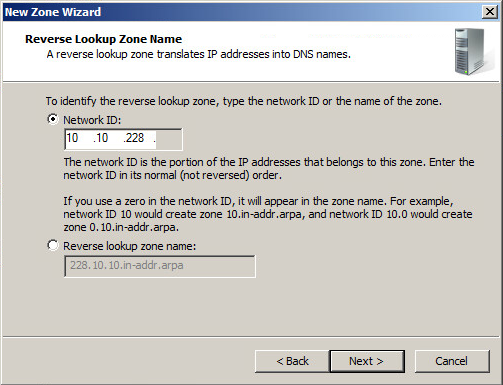
  • Check Network ID
  • Enter the 3 first byte of Network IP Adress (10.10.228)
  • Click Next

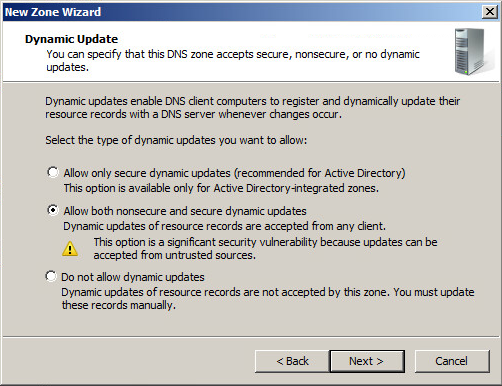
  • Check Allow both non secure and secure dynamic updates
  • Click Next

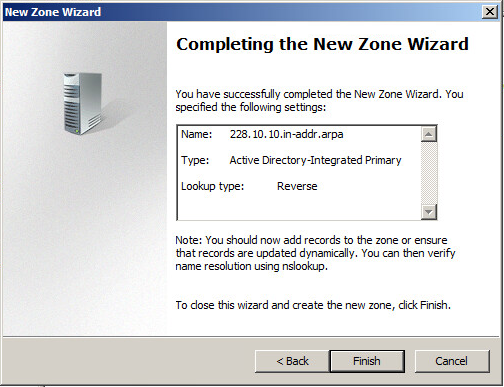
  • Check all gathered information
  • Click Finish

Adding host

  • Click Start / Administrative Tools / DNS
  • Right click on the domain name

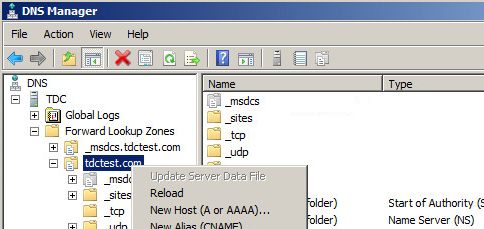
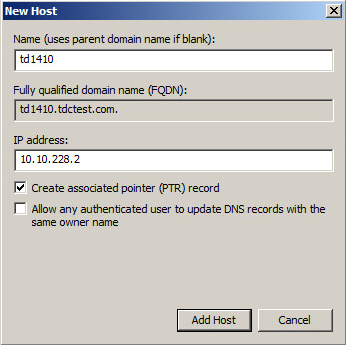
  • Select New Host (A or AAAA)

  • In Name, enter the Teradata node name
  • In IP address, type the Teradata node IP address
  • Check Create associated pointer (PTR) record
  • Click Add Host
  • Click Done on the new screen appearing

Active Directory

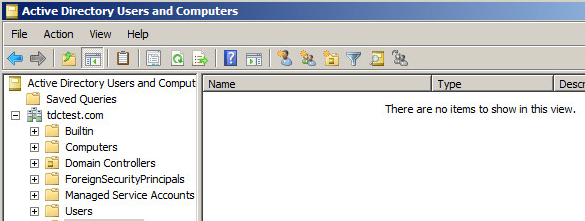
  • Click Start / Administrative tools / Active Directory Users and Computers

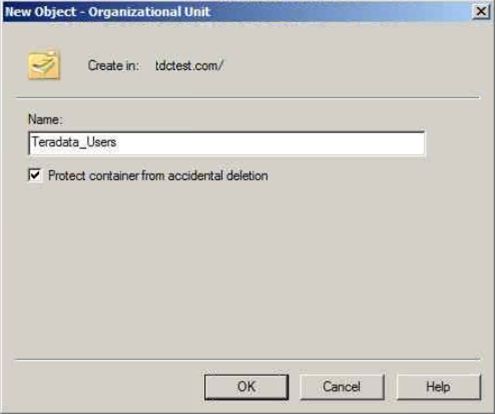
Creating an Organization Unit (OU)

  • Fill out the Name field with the name of the OU you want to create

Adding users

In Active Directory

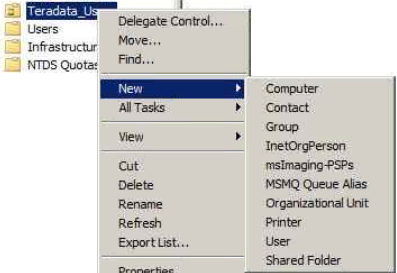
  • Right click on Teradata_Users
  • Select New / User

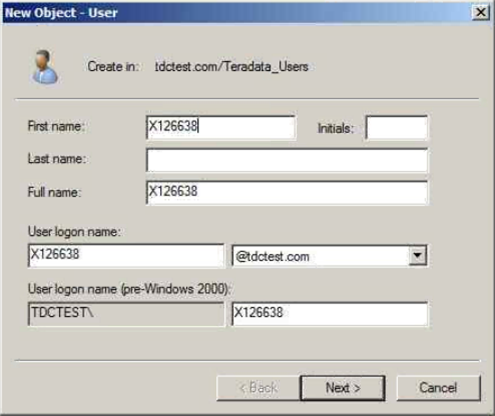
  • In First Name, add the user’s name
  • In User logon name, check the autocompleted name
  • Click Next

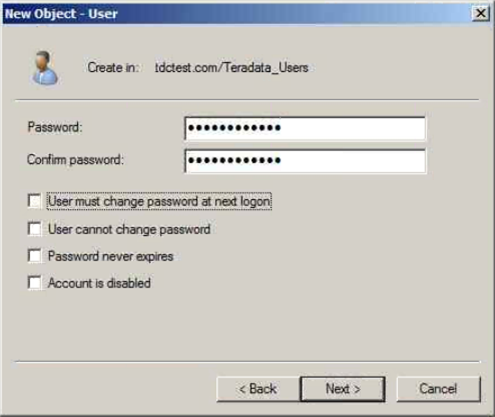
  • In Password field, enter the password following the security rules
  • In Confirm password field, retype the previous password
  • Click Next

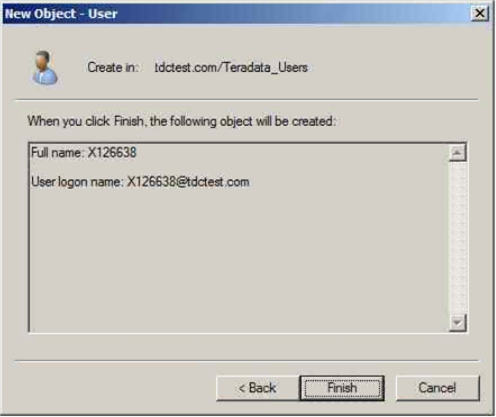
  • Click Finish

Tree containers organization

I would recommend you to organize your container as the following, in order to classify and order your users, roles and profiles

For each level repeat the previous step, by adding an Organization Unit.

This will allow you to add different systems (Production, Pre-Prod, development…), ecah one will receive the right containers.

Creating Profiles

  • Click Start / Administrative Tools / ADSI Edit
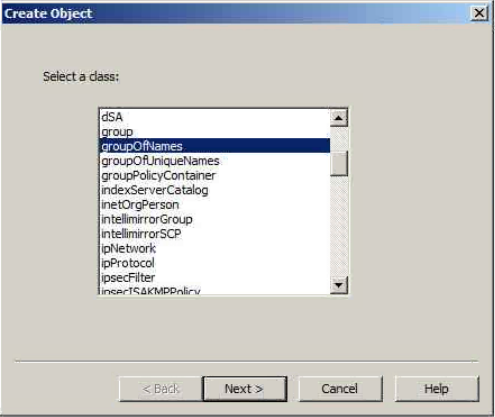
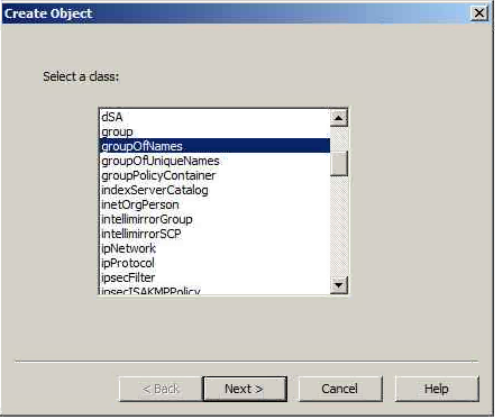
  • Right click the User OU / select New / Object…

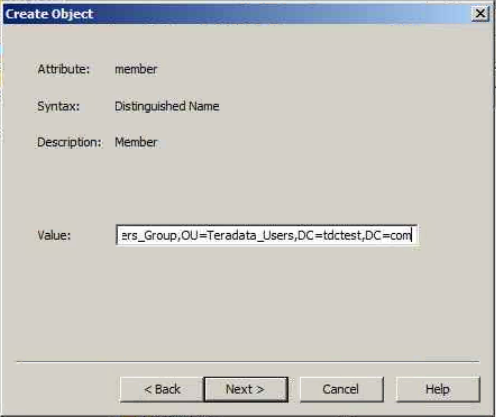
  • Select groupOfNames
  • Click Next >

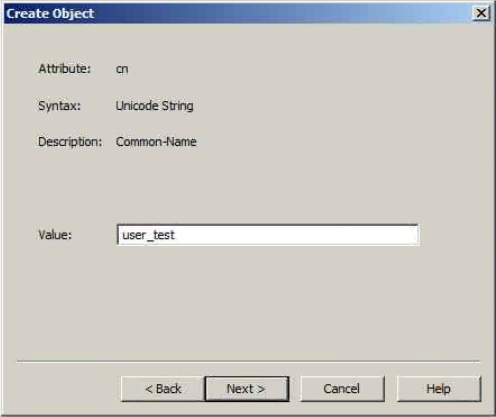
  • In Value field, enter the profile name
  • Click Next >

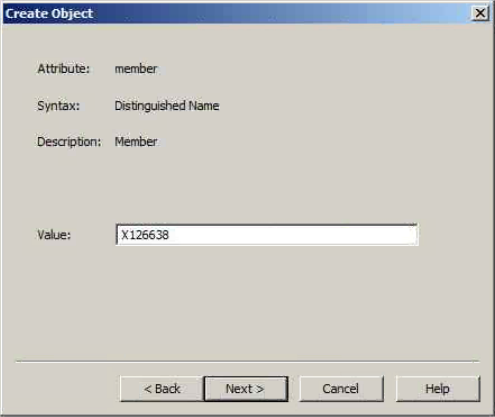
  • Click Next >

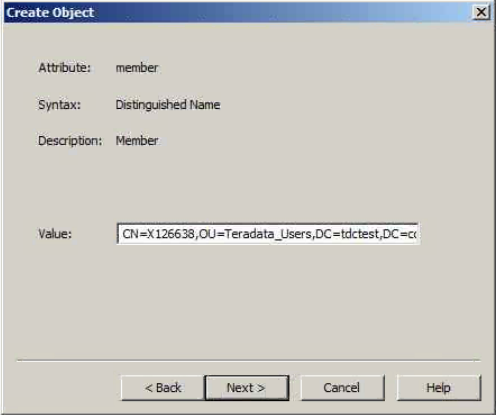
  • In Value field, enter CN=X126636,OU=Teradata_Users,DC=tdctest,DC=com
  • Click Next >

  • Click Finish

Creating users groups

  • Click Start / Administrative Tools / Active Directory Users and Computers

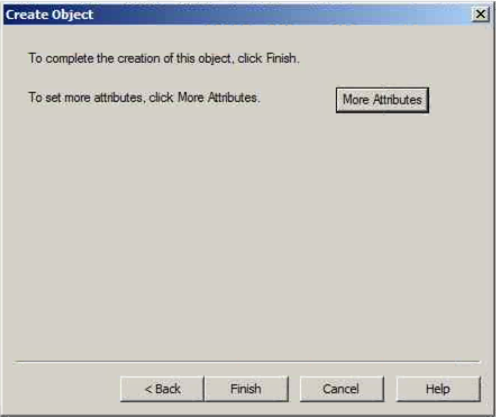
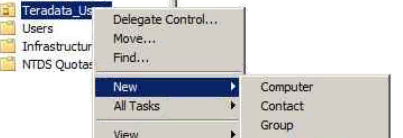
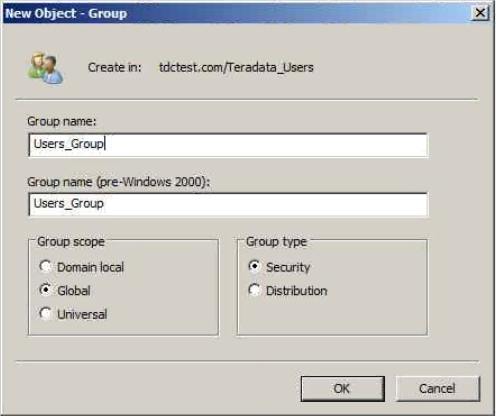
Right click Teradata Users OU / New / Group

  • In Group name field, enter the group name
  • In Group scope panel, Check Global
  • In Group type panel, Check Security
  • Click OK

Adding users to Group

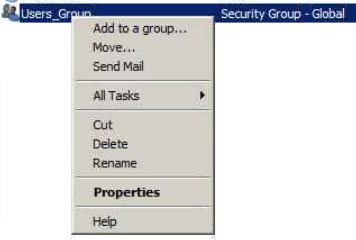
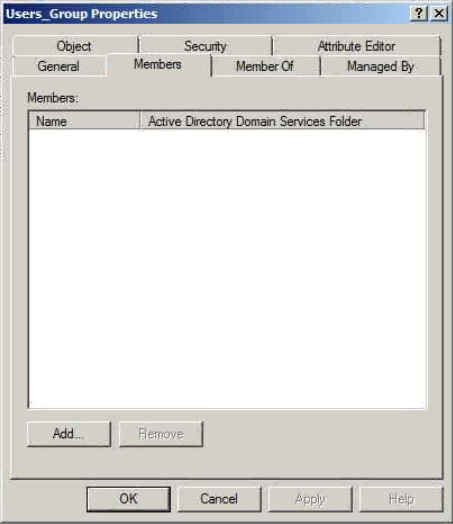
  • Right click on the group previously created, select Properties

  • Click Members panel
  • Click Add…

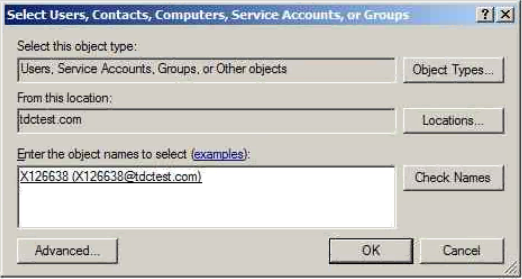
  • In Enter the object names to select, enter the user you want to add in the group
  • Click Check Names to autocheck the name spelling
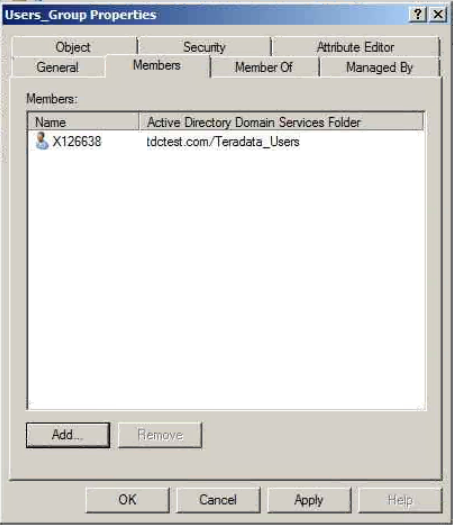
  • Click OK

  • Click OK

Creating roles

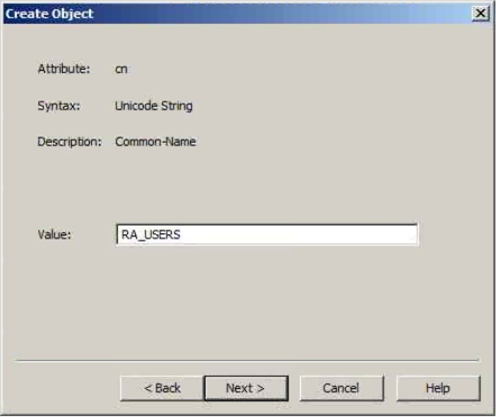
  • Open ADSI Edit tool
  • Right click the User OU / select New / Object…

  • Click Next >

  • Click Next >

  • In Value field, enter CN=Users_Group,OU=Teradata_Users,DC=tdctest,DC=com
  • Click Next >

  • Click Finish

Setting up tdgssUserConfigFile

On Teradata edit in VI the /opt/Teradata/tdat/tdgss/site/TdgssUserConfigFile.xml file

Be sure that the bold properties below are set in this file


AuthenticationSupported="yes" 
AuthorizationSupported="yes"
 MechanismEnabled="yes" 
MechanismRank="70" 
DefaultMechanism="no" 
DelegateCredentials="yes" 
MutualAuthentication="yes" 
ReplayDetection="yes" 
OutOfSequenceDetection="yes"
 
ConfidentialityDesired="yes" 
IntegrityDesired="yes" 
AnonymousAuthentication="no"
 
DesiredContextTime="" 
DesiredCredentialTime=""
CredentialUsage="0" 
VerifyDHKey="no" 

LdapClientMechanism="Simple"
 
LdapServerName="ldap://tdc.tdctest.com/"
 
LdapServerPort="389" 
LdapGroupBaseFQDN="ou=Teradata_Users,dc=tdctest,dc=com"
LdapSystemFQDN="ou=tdprod,ou=tdat,dc=tdctest,dc=com" 
LdapUserBaseFQDN="" 
/> 

  
/> 
            

Applying the modified settings

On the Teradata node, enter the following command

  • run_tdgssconfig

Restarting the database

On the Teradata node, enter the following command

  • tpareset –y Restart LDAP

Where Restart LDAP is your comment for further log consultation

How to get LDAP parameters in Active Directory

These following commands can help to get some information about your path in AD nodes

  • Click Start / Command Prompt
  • Type dsquery computer

Can be used in the LdapSystemGFQDN line

  • Type dsquery group

Can be used in the the LdapGroupBaseFQDN line

  • Type dsquery user

Can be used in the LdapUserBaseFQDN line (remove the user part to keep only from OU)

Creating a profile

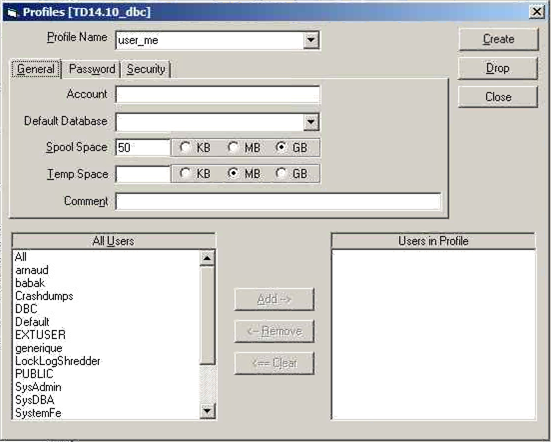
  • In Teradata administrator, click Tools / Create / Profile…

  • In Profile Name, enter the Profile’s name
  • In Spool Space, enter the quantity of spool who want to apply to the profile
  • Click Create
  • Click Close

Creating a role

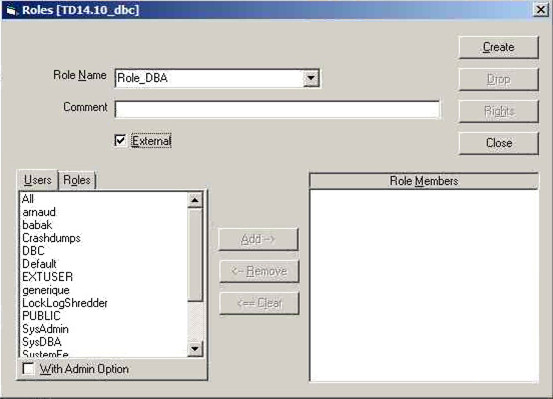
  • In Teradata administrator, click Tools / Create / Role…

  • In Role Name field, enter the Role’s name
  • Check External
  • Click Create
  • Click Close

Creating a user

  • In Teradata Administrator, click Tools / Create / User…

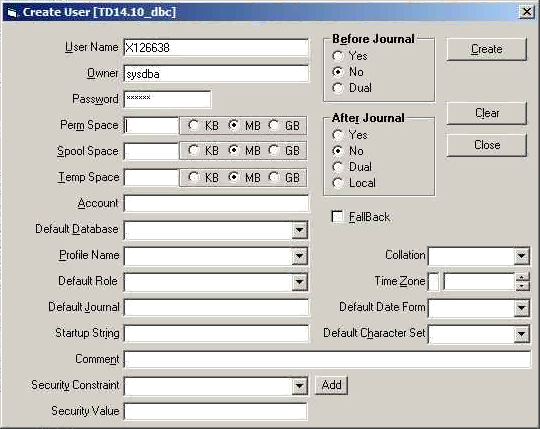
  • In User name filed, enter the username you want to create
  • In Owner field, enter the hierarchical owner
  • In Password field, enter the password
  • Click Create
  • Click Close

Allowing a user to logon with a null password

After creating a user, you must grant the user the right logon privileges

  • In SQL Assistant, logon with admin rights and type
  • GRANT LOGON ON ALL TO X126638 WITH NULL PASSWORD;

How to test your connectivity

With a mapped user in Teradata

On the Teradata node, launch the following command:

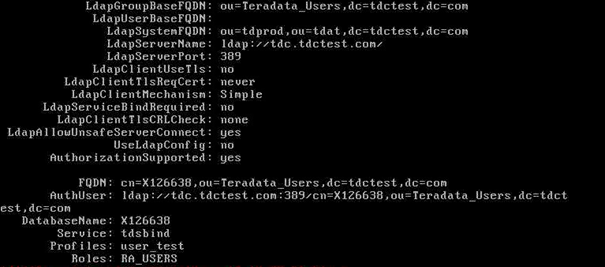
  • tdsbind –u X126638 –w password

Here is the result

Constraints and limits

With a mapped user in Teradata

If users are mapped in Teradata, by creating explicitly a user in Teradata database, there are no other constraints and limits than those already known with a common usage.

With an unmapped user in Teradata

Here are the constraints and limitation for an unmapped user:

  • No function touching a USER object can be defined
  • All unmapped users will share the same Spool space
  • All unmapped users will share the same Temp space
  • Unmapped users can not create Volatile tables
  • Unmapped users can not create Temporary tables
  • No inheritance of implicit creator rights after object creation
  • Names of unmapped users won’t be displayed in Viewpoint
  • TASM rules cannot be defined for unmapped users

C# How to trap a wrong value updated in a GridView

Here is a small routine I had to develop in order to solve a problem about editing an integer value in a grid.

How to trap the error is the user put a letter instead of an integer and click update?

NameSpace

First of all I’m using collections, so we must import the relevant namespace

using System.Collections;


Grid Sample code


C# Code on RowUpdating grid event / Column QUANTITE_COMMANDE


protected void grdCart_RowUpdating(object sender, GridViewUpdateEventArgs e)
{
	string strQty = "";
	DictionaryEntry ColEntry;

	//Browse the new values and save them in a collection (key / value)
	foreach (DictionaryEntry entry in e.NewValues)
	{

		if (entry.Key.ToString() == "QUANTITE_COMMANDE") //Corresponding to Datafield in your Grid
		{
			strQty = entry.Value.ToString();
			ColEntry.Key = entry.Key;
			ColEntry.Value = entry.Value;
		}

	}

	//Isolate the new value
	int intQty;

	// Try to convert the new value to integer
	try
	{
		intQty = int.Parse(strQty);
	}
	// If conversion fails then go back to the old value
	catch
	{
		intQty = int.Parse(e.OldValues[ColEntry.Key].ToString());
	}

	// Set the Quantity (old or new) to the new value in order to update it
	e.NewValues[ColEntry.Key] = intQty;

}

Troubleshooting Spool issues

I recently had a backup failure because of a ‘left-over spool’.

This particular spool problem occurs when a query completes but the Database engine is not able to remove to spool space used because of a bug.

In this case we get this kind of message

*** Failure 2667: Left-over spool table found: transaction aborted

2 kinds of spool issues:

  • A phantom spool that means a mismatch between the space occupied by a spool for a user and the value found in dbc.diskspace. A phantom spool does not have an real existence on the disk
  • A left-over spool that is a real table spool existing on the disk, or/and with a header missing.

How to find the mismatching spool space

In SQL Assistant, play the following query against your system:

SELECT DATABASENAME, SUM(CURRENTSPOOL) AS LEFTOVER_SIZE
FROM DBC.DISKSPACE
WHERE DATABASENAME NOT IN
(
SELECT USERNAME FROM DBC.SESSIONINFO
)
AND CURRENTSPOOL > 0
GROUP BY 1
ORDER BY 1,2
WITH SUM(CURRENTSPOOL)

Get the databasename involved in the spool space problem, let says DB1

Updating spool space

  • Connect to PDN Teradata node
  • Type cnsterm 6
  • In the new windows type start updatespace
  • This command starts the updatespace utility and give you back a windows number (ie Started ‘updatespace’ in window 3)
  • CTRL + C to exit the windows
  • Type cnsterm 3 (or other number regarding the sent back message)
  • Type update spool space for DB1; (where DB1 is the database name you got previously) – don’t forget the comma at the end!

Controling

  • Play again the query to control the updated space and check if you still have a phantom spool

If no rows are returned, then you were facing a phantom space issue: everything is OK now.

If some rows are returns, then you are facng a left-over spool problem

In this case, you must restart your RDBMS, or call your Teradata support: in some cases they can remove the left-over spool table without restarting the machine.

Stoping updatespace utility

Never forget to stop the utility you launch

  • Type quit

When you get Exiting Updatespace program, then press CTRL + C to go back to the original windows

Troubleshooting cnsterm problems

In some cases, if you forget to stop the utilities you launch you can face the following message when you try to launch the updatespace utility:

CNSSUP start: All interactive Partitions are busy!!

You will have to connect to all cnsterm and type quit (or another command sometimes) to clear everything and being able to connect properly to a cnsterm to perform your administration task

Teradata: Automating statistics in Stats Manager

Defining the statistics you have to play against one or more tables in a database

For an example, we are going to implement statistics against the dictionary. These statistics are excerpted from Carrie Ballinger’s Blog, to make everything clear!

First of all, we must play the following script in order to register the statistic in the dictionary. Though, statistics will be collected one time, but it’s not enough, you will need to synchronize the dictionary with stats manager…

Let’s try it!

List of Collect statistics commands

COLLECT STATISTICS
COLUMN TvmId ,
COLUMN UserId ,
COLUMN DatabaseId ,
COLUMN FieldId ,
COLUMN AccessRight ,
COLUMN GrantorID ,
COLUMN CreateUID ,
COLUMN (UserId ,DatabaseId) ,
COLUMN (TVMId ,DatabaseId) ,
COLUMN (TVMId ,UserId) ,
COLUMN (DatabaseId,AccessRight) ,
COLUMN (TVMId,AccessRight) ,
COLUMN (FieldId,AccessRight) ,
COLUMN (AccessRight,CreateUID) ,
COLUMN (AccessRight,GrantorID) ,
COLUMN (TVMId ,DatabaseId,UserId)
ON DBC.AccessRights;

COLLECT STATISTICS
COLUMN DatabaseId ,
COLUMN DatabaseName ,
COLUMN DatabaseNameI ,
COLUMN OwnerName ,
COLUMN LastAlterUID ,
COLUMN JournalId ,
COLUMN (DatabaseName,LastAlterUID)
ON DBC.Dbase;


COLLECT STATISTICS
COLUMN LogicalHostId ,
INDEX ( HostName )
ON DBC.Hosts;

COLLECT STATISTICS
COLUMN OWNERID ,
COLUMN OWNEEID ,
COLUMN (OWNEEID ,OWNERID)
ON DBC.Owners;

COLLECT STATISTICS
COLUMN ROLEID ,
COLUMN ROLENAMEI
ON DBC.Roles;

COLLECT STATISTICS
INDEX (GranteeId)
ON DBC.RoleGrants;
 
COLLECT STATISTICS
COLUMN (TableId) ,
COLUMN (FieldId) ,
COLUMN (FieldName) ,
COLUMN (FieldType) ,
COLUMN (DatabaseId) ,
COLUMN (CreateUID) ,
COLUMN (LastAlterUID) ,
COLUMN (UDTName) ,
COLUMN (TableId,FieldName)
ON DBC.TVFields;
 
COLLECT STATISTICS
COLUMN TVMID ,
COLUMN TVMNAME ,
COLUMN TVMNameI ,
COLUMN DATABASEID ,
COLUMN TABLEKIND ,
COLUMN CREATEUID ,
COLUMN CreatorName ,
COLUMN LASTALTERUID ,
COLUMN CommitOpt ,
COLUMN (DatabaseId,TVMName) ,
COLUMN (DATABASEID ,TVMNAMEI)
ON DBC.TVM;
 
COLLECT STATISTICS
INDEX (TableId) ,
COLUMN (FieldId) ,
COLUMN (IndexNumber) ,
COLUMN (IndexType) ,
COLUMN (UniqueFlag) ,
COLUMN (CreateUID) ,
COLUMN (LastAlterUID) ,
COLUMN (TableId,DatabaseId) ,
COLUMN (TableId,FieldId) ,
COLUMN (UniqueFlag,FieldId) ,
COLUMN (UniqueFlag,CreateUID) ,
COLUMN (UniqueFlag,LastAlterUID) ,
COLUMN (TableId,IndexNumber,DatabaseId)
ON DBC.Indexes;
 
COLLECT STATISTICS
COLUMN (IndexNumber) ,
COLUMN (StatsType)
ON DBC.StatsTbl;
 
COLLECT STATISTICS
COLUMN (ObjectId) ,
COLUMN (FieldId) ,
COLUMN (IndexNumber) ,
COLUMN (DatabaseId,ObjectId,IndexNumber)
ON DBC.ObjectUsage;
 
COLLECT STATISTICS
INDEX (FunctionID ) ,
COLUMN DatabaseId ,
COLUMN ( DatabaseId ,FunctionName )
ON DBC.UDFInfo;
 
COLLECT STATISTICS
COLUMN (TypeName) ,
COLUMN (TypeKind)
ON DBC.UDTInfo;
 
COLLECT STATISTICS
COLUMN (QueryID)
ON DBC.DBQLSqlTbl;
 
COLLECT STATISTICS
COLUMN (CollectTimeStamp),
COLUMN (QueryID),
COLUMN (UserID),
COLUMN (SessionID),
COLUMN (AppID),
COLUMN (StartTime),
COLUMN (ErrorCode),
COLUMN (StatementType),
COLUMN (UserName)
ON DBC.DBQLogTbl;


Syncing the DBC dictionary with TDStats database
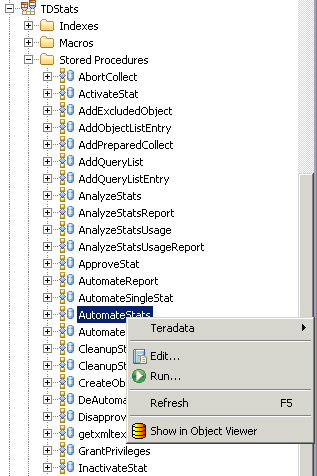
  • Click Run…

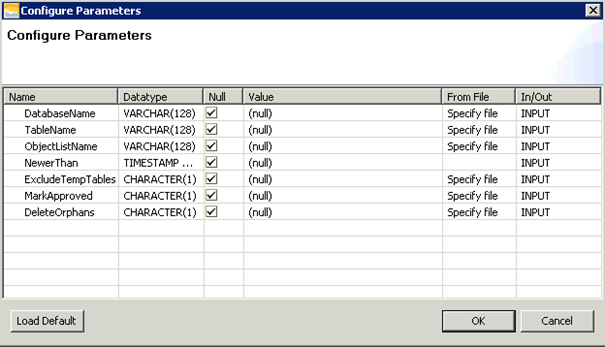
  • Uncheck Null case in DatabaseName field

On DatabaseName line, uncheck Null and enter DBC
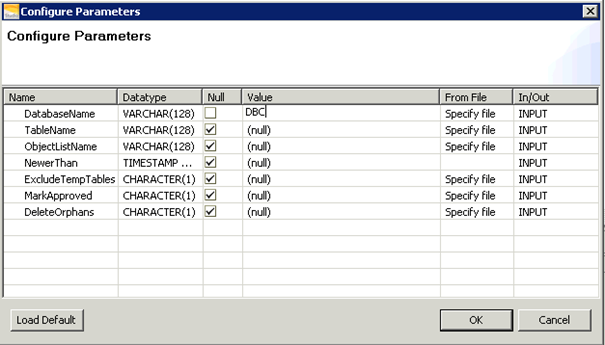
  • Click OK

Result

DatabaseName,INPUT,VARCHAR(128),DBC,
TableName,INPUT,VARCHAR(128),,
ObjectListName,INPUT,VARCHAR(128),,
NewerThan,INPUT,TIMESTAMP WITH TIME ZONE,,
ExcludeTempTables,INPUT,CHARACTER(1),,
MarkApproved,INPUT,CHARACTER(1),,
DeleteOrphans,INPUT,CHARACTER(1),,
AutomateId,OUTPUT,BIGINT,,909
NumCopied,OUTPUT,INTEGER,,51
NumRemoved,OUTPUT,INTEGER,,0

Create Job on Stats Manager

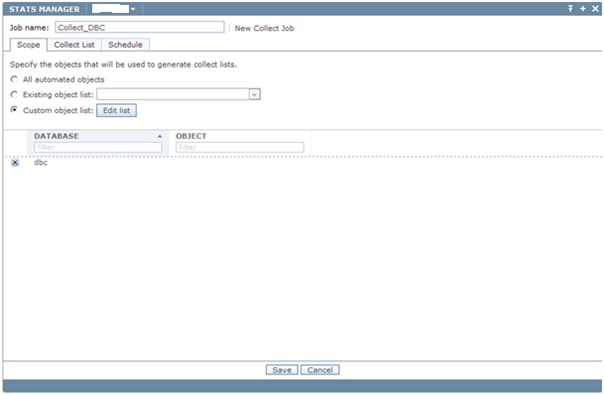
  • Click Jobs Tab / Actions / New Collect Job
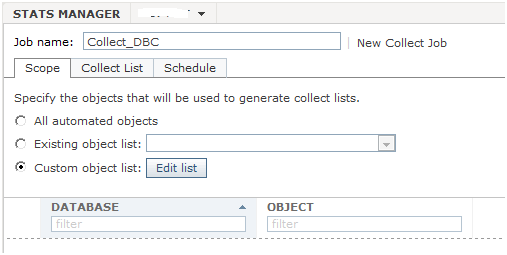
  • In Job name field, enter the job’s name
  • Check Custom object list
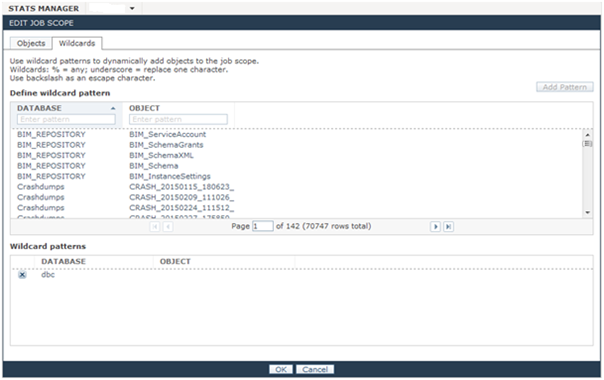
  • Click Edit list

  • In Database type DBC
  • Click Add Pattern
  • Click OK

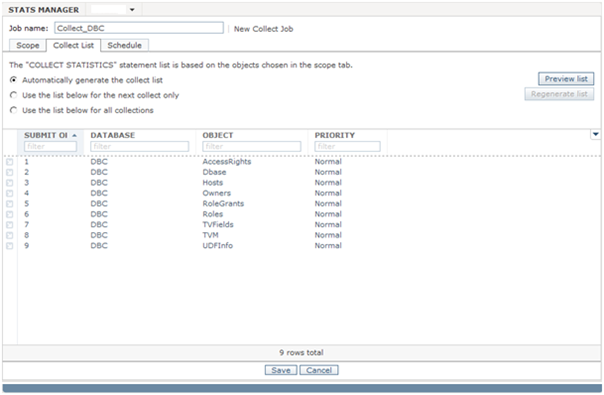
  • Click Collect List tab
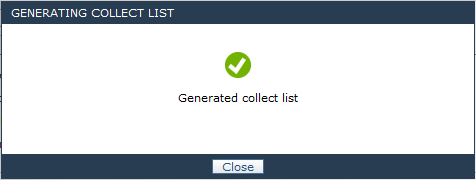
  • Click Preview list

  • Click Close

  • Click Save

 Scheduling a job

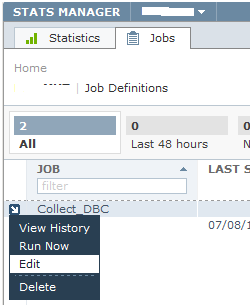
  • Click on the blue arrow
  • Click Edit


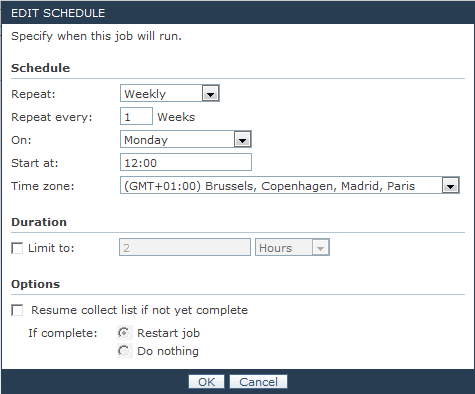
  • Click Add Schedule

  • In Repeat list, select Weekly
  • In Repeat every, type 1
  • In On, Select Monday
  • In Start at, choose the time you want to execute the job
  • Click OK

Repeat this operation for every day of the week you want to schedule the job for.

  • Click Save

 Troubleshooting

 Invalid session mode

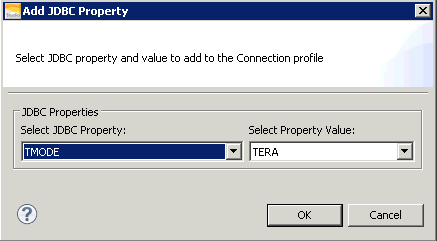
Failed [5510 : HY000] Invalid session mode for procedure execution.

Solution: Change ANSI Mode To TERA
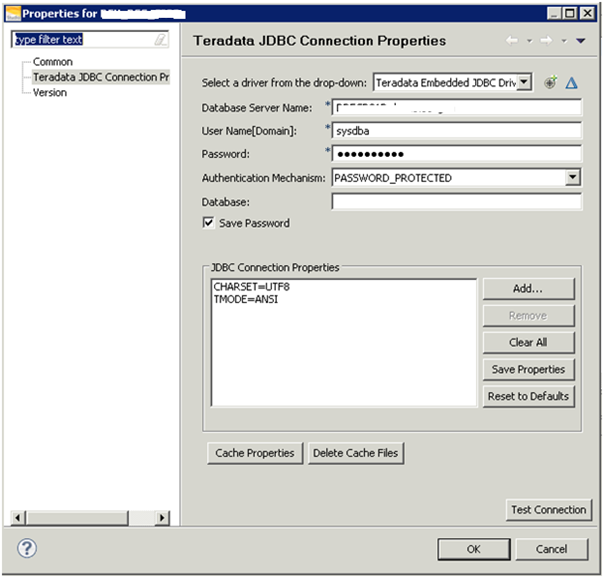
  • Click Add…

  • Click OK

  • Click OK
  • Click Test Connection

  • Click OK

  • Click Yes

 Access problem

The user does not have EXECUTE PROCEDURE access to TDStats.AutomateStats.

Solution

  • GRANT EXECUTE PROCEDURE ON TDSTATS TO SYSDBA

 Error after job is completed

 Finding the error

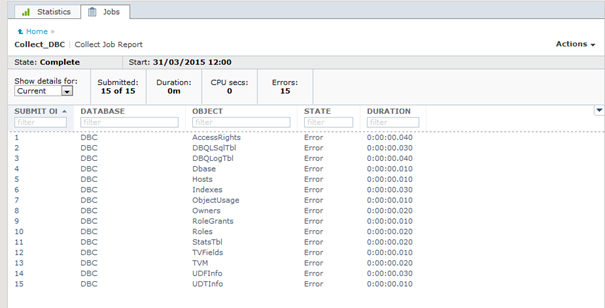
  • Click on Collect_DBC

  • Click on 1 to view the details of error
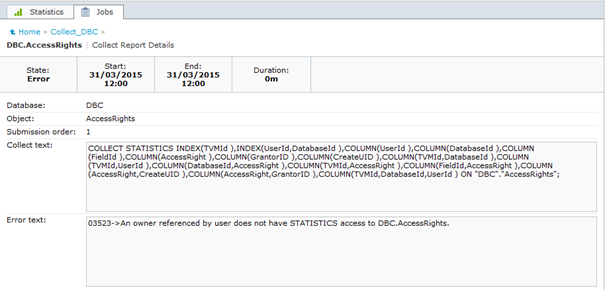
Solution

GRANT STATISTICS ON DBC.TVFields TO TDSTATS;
GRANT STATISTICS ON AccessRights TO TDSTATS;
GRANT STATISTICS ON DBC.DBQLSqlTbl TO TDSTATS;
GRANT STATISTICS ON DBC.DBQLogTbl TO TDSTATS;
GRANT STATISTICS ON DBC.Dbase TO TDSTATS;
GRANT STATISTICS ON DBC.Hosts TO TDSTATS;
GRANT STATISTICS ON DBC.Indexes TO TDSTATS;
GRANT STATISTICS ON DBC.ObjectUsage TO TDSTATS;
GRANT STATISTICS ON DBC.Owners TO TDSTATS;
GRANT STATISTICS ON DBC.RoleGrants TO TDSTATS;
GRANT STATISTICS ON DBC.Roles TO TDSTATS;
GRANT STATISTICS ON DBC.StatsTbl TO TDSTATS;
GRANT STATISTICS ON DBC.TVM TO TDSTATS;
GRANT STATISTICS ON DBC.UDFInfo TO TDSTATS;
GRANT STATISTICS ON DBC.UDTInfo TO TDSTATS;

Run again your job to check if everything is correct now.

Teradata really moveable space

Because of its particular features and ‘always parallel’ implementation, Teradata must have a very good distribution amongst AMP.
This will enhance performances, query time execution, and space.
In this example, I’m going to explain how you can dramatically affect your space management with a bad distribution

Here is the postulate (I make it simple purposely in order things to be clear);

  • Your system has 10 AMP
  • One database on your system is 100Gb large (100 Gb of maxperm).
  • There is one table in the database

That means, the system automatically dispatches the space, dividing 100Gb by 10 AMP, so 10Gb by AMP

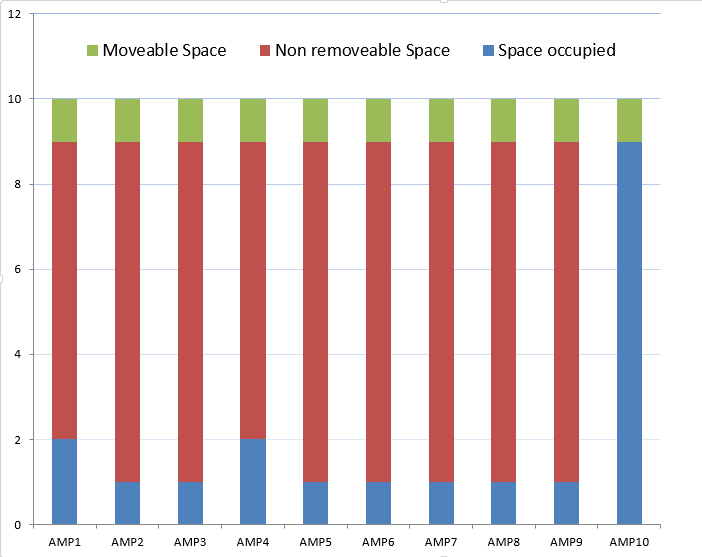
Now if you choose bad distribution for your table, by choosing badly your PI (Primary Index) that is not reflecting a good selectivity, you can have the following figure


AMP_repartition

In theory, on 100Gb, only 20Gb are used and you can pick back 80Gb of free space.

In theory, yes you can! But practically, you can not

Just try to perform against your database a move space for 80Gb, and you will receive an error message saying you can not perform this operation…

Why? Because if you try to remove 80GB amongst 10AMP, the system tries to remove equally 80/10 so 8Gb on each AMP. It will work for AMP 1 to 9, but not for AMP 10!!! Data are stored on this AMP.

The real space you can only pick back is the following

  • You take the most loaded AMP, take the Maxperm (10Gb) minus currentperm for this AMP (9Gb), so 1Gb
  • You multiply this 1Gb by the number of AMP (10) and you obtain the quantity of space you can really pick back, that means, 10 X 1 = 10Gb

If you compare this 10Gb to 80Gb theoretically moveable, what a difference, right?

70GB will stay free, but never really usable, and never moveable…

So here is a query you can perform against your system to know, the amount of space you can really move:

SELECT
TRIM(C.databasename) AS DATABASENAME,
C.VPROC_COUNT AS VPROC_COUNT,
C.BIGGER_SPACE AS AMP_WITH_MORE_USED_SPACE,
C.MAXPERM AS MAXPERM_BY_AMP,

CASE
  WHEN C.BIGGER_SPACE = 0 THEN 0
  WHEN C.BIGGER_SPACE <> 0 AND C.MAXPERM <>0 THEN
  (C.MAXPERM - C.BIGGER_SPACE) * VPROC_COUNT
  ELSE 0
END
AS REUSABLE_SPACE

FROM
(
SELECT
DatabaseName,
COUNT(VProc) ,
CAST(MAX(CurrentPerm) AS BIGINT),
CAST(MAX(MaxPerm) AS BIGINT)
FROM DBC.DiskSPace
GROUP BY 1
) C  (DatabaseName, VPROC_COUNT, BIGGER_SPACE, MAXPERM)

WHERE
  REUSABLE_SPACE > 1000000000
  AND DatabaseName NOT IN
  ('DBC', 'Crashdumps', 'viewpoint', 'SystemFe', 'SYSBAR')

ORDER BY
REUSABLE_SPACE DESC

Setting up a mirroring between 2 databases

Setting up a mirroring between 2 databases

EndPoint creation on the principal and rights setting

USE master 
go

----------------------------------------------------------
--	Creation du EndPoint Principal
----------------------------------------------------------
IF NOT EXISTS (SELECT *  FROM sys.endpoints WHERE TYPE=4)
	CREATE ENDPOINT EndPoint_Principal
		STATE = STARTED
		AS TCP ( LISTENER_PORT = 5022 )
		FOR DATABASE_MIRRORING (
		   ENCRYPTION = SUPPORTED,
		   ROLE=PARTNER);
GO

--DROP ENDPOINT EndPoint_Principal

----------------------------------------------------------
--	Grant du compte de service SQL Engine / EndPoint
----------------------------------------------------------
GRANT CONNECT ON ENDPOINT::EndPoint_Principal TO [domain\accountname]


EndPoint creation on the Mirror and rights setting

USE master
go

----------------------------------------------------------
-- Creation du EndPoint Mirror
----------------------------------------------------------
IF NOT EXISTS (SELECT * FROM sys.endpoints WHERE TYPE=4)
CREATE ENDPOINT EndPoint_Mirror
STATE = STARTED
AS TCP ( LISTENER_PORT = 5023 )
FOR DATABASE_MIRRORING (
ENCRYPTION = SUPPORTED,
ROLE=PARTNER);
GO

--DROP ENDPOINT EndPoint_Mirror

----------------------------------------------------------
-- Creation du User / Login et Grant
----------------------------------------------------------
GRANT CONNECT ON ENDPOINT::EndPoint_Mirror TO [domain\accountname]


EndPoint creation on the Witness and rights setting

USE master 
go

----------------------------------------------------------
--	Creation du EndPoint Principal
----------------------------------------------------------
IF NOT EXISTS (SELECT *  FROM sys.endpoints WHERE TYPE=4)
	CREATE ENDPOINT EndPoint_Witness
		STATE = STARTED
		AS TCP ( LISTENER_PORT = 5024 )
		FOR DATABASE_MIRRORING (
		   ENCRYPTION = SUPPORTED,
		   ROLE=WITNESS);GO

--DROP ENDPOINT EndPoint_Witness

----------------------------------------------------------
--	Creation du User / Login et Grant
----------------------------------------------------------
GRANT CONNECT ON ENDPOINT::EndPoint_Witness TO [domain\accountname]

Sauvegarde et restauration de la base principale

On Principal instance

BACKUP DATABASE [DatabaseName] TO  DISK = N'D:\DatabaseName.bak' WITH NOFORMAT, NOINIT,  NAME = N'DatabaseName-Full Database Backup', SKIP, NOREWIND, NOUNLOAD,  STATS = 10

BACKUP LOG [DatabaseName] TO  DISK = N'D:\DatabaseName.trn' WITH NOFORMAT, NOINIT,  NAME = N'DatabaseName-Transaction Log  Backup', SKIP, NOREWIND, NOUNLOAD,  STATS = 10

On Mirror instance


RESTORE DATABASE [DatabaseName]
FROM DISK= N'D:\DatabaseName.bak' WITH 
MOVE N'DatabaseName' TO N'D:\SPAppli\MSSQL10_50.IRXAIVTX102\MSSQL\DATA\ritmx.mdf'
, MOVE N'DatabaseName_log' TO N'D:\SPAppli\MSSQL10_50.IRXAIVTX102\MSSQL\DATA\ritmx.ldf'
, NORECOVERY--, REPLACE

RESTORE LOG DatabaseName 
FROM DISK= N'D:\DatabaseName.trn' WITH NORECOVERY

Setting partnership

On Mirror instance


USE master
Go

ALTER DATABASE DatabaseName
SET PARTNER ='TCP://SRXAIVTX101.domain.xxxxx.fr:5022'

On Principal instance

USE master
Go

ALTER DATABASE DatabaseName
SET PARTNER ='TCP://SRXAIVTX102. domain.xxxxx.fr:5023'

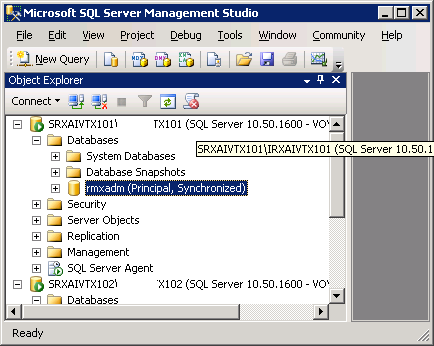
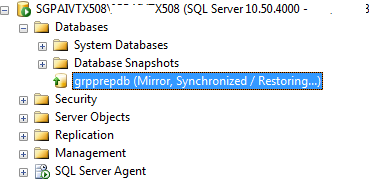
If you take a look in SSMS, at the Principal instance, you should see something looking loke the following screen (Principal, Synchronized) beside the database


In the same wy in SSMS Mirror side, you should see (Mirror, Synchronized,Restoring…) beside the mirrored database

Witness setting

On Principal instance

USE master
go

————————————————–


– Cree un partenariat avec le serveur Temoin


————————————————–

ALTER DATABASE DatabaseName
SET WITNESS =‘TCP://SCEAIVTX101. domain.xxxxx.fr :5024′

Automatic failover checking

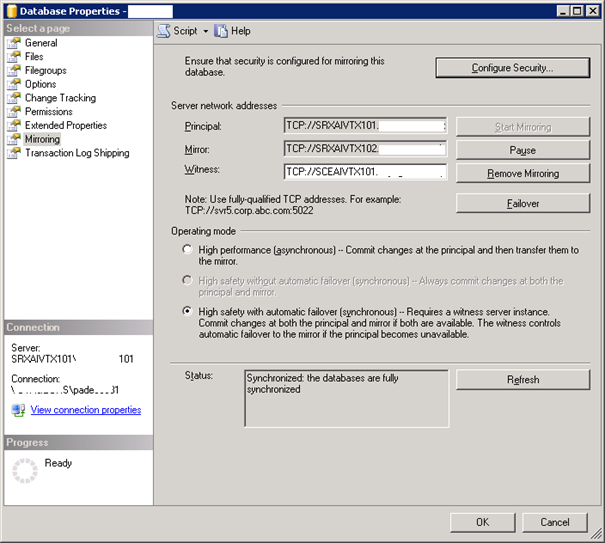
The global configuration is activated with High Safety automatic failover mode.

You can check it on the following screen

Troubleshooting

The server cannot be reached

Message

The server network address “TCP://SRVAIVTX101:5023″ cannot be reached or does not exist.
Check the network address name and that the ports for the local and remote endpoints are operational.

Cause 1 = log file is too old

Make sure the database has been restored correctly with ‘NORECOVERY’ Option

Launch a new backup of the transaction log, and restore it on the mirror instance

On Principal instance

USE master
GO

BACKUP LOG DatabaseName TO DISK =‘D:\DatabaseName.trn’

On Mirror instance

RESTORE LOG DatabaseName FROM DISK= 'D:\DatabaseName.trn' WITH NORECOVERY

Cause 2 = Port opening

Open a console view and test if ports are opened, with telnet command and with server names

  • telnet SRVAIVTX101. domain.xxxxx.fr 5022
  • telnet SRVAIVTX102. domain.xxxxx.fr 5023
  • telnet SCEAIVTX101. domain.xxxxx.fr 5024

If it does not connect, the, try by using directly IP adresses, instead of server names

  • telnet 10.254.25.36 5022
  • telnet 10.254.25.37 5023
  • telnet 10.254.25.38 5024

If you can connect now, there is a DNS problem

If the connection fails, then there is a tunneling problem:

  • firewall between servers entre les machines
  • differents domains non approved
  • firewall software (you will have to create exceptions)

Cause 3 = Endpoints issues

On each instance, try the following command :

  • Select * from sys.database_mirroring_endpoints

STATE_DESC column must show STARTED. If it’s not the case, you have to start the endpoint with the ALTER ENDPOINT command

Cause 4 = ENDPOINTS Grant

On each instance, try the following command :

  • GRANT CONNECT ON ENDPOINT::Mirroring TO ALL

Cause 5 = Recréation des ENDPOINTS re-creation

On each instance, drop endpoints and created them again

How to drop an ENDPOINT

  • DROP ENDPOINT EndPoint_Mirror

Log too old

Message

The remote copy of database “DatabaseName” has not been rolled forward to a point in time that is encompassed in the local copy of the database log.

Contournement

Perform again, backup and restore operation of the principal database (full + logs)

Migrating a SQL Server 2000 database to 2008R2 (or higher) in one shot

Point of this article

I often face with problems when clients try to migrate their databases:

  • They implement new policies in new databases versions
  • They want to follow the best practices given by Microsoft
  • They want to change the collation
  • They don’t want to interrupt more than a few minutes, the activity for critical databases

To put everything in a nutshell, they want something almost impossible, and so they are procrastinating again and again…

But now as SQL Server 2000 is not supported anymore, they have no more choice: They must migrate !

You can not imagine the numbers of databases that are still running under SQL Server 2000, and it works, so why would they change anything, right?

In this article I provide a solution to migrate a database playing by the whole constraints listed above… In one shot you will migrate a database from SQL Server 2000, with SQL Server 7 compatibility to SQL Server 2008R2 (or higher)

All the Microsoft PFE will answer you this is impossible:

  • because you can just go through SQL Server 2005 as intermediate step
  • because if you change the collation, you have to import data, after creating a database from scratch
  • Because you must sometimes, remove the constraints and apply them again later (if you can)
  • Because the time taken by the 2 backups ans the 2 restore operations will take hours

Here is the solution: Use the transactional replication: it’s included in your product and amazingly powerfull

  • You will change the collation in one shot
  • You will migrate a big percentage of your data
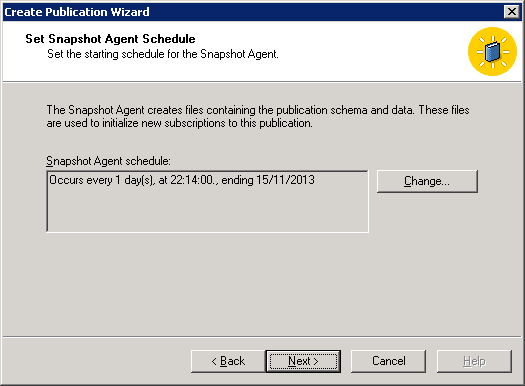
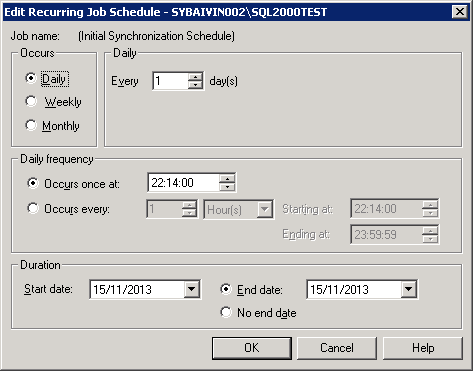
  • At the last moment, you will synchronize the databases and you will finish the last in a few minutes, not even stopping your activity!

One more thing: As production servers are often at heir limit, you don’t want to add an overhead activity that could put your server down: in this case I use a pull replication, so you can make your boss confortable with this argument.

To be clear, there is no excuse to migrate it NOW!!!

In this example we have:

  • An SQL Server 2000 installed with latin collation
  • A source database on this SQL Server 2000, with 7.0 compatibility
  • A SQL Server 2008R2 installed with FRENCH_CI_AS Collation

So roll up your sleeves a little bit, take your coffee and follow that step by step !

How to set the publisher (SQL Server 2000)

Share folder creation

  • On your server, have to create a folder called ReplData that will be shared, and will contain the snapshots files of your future replication
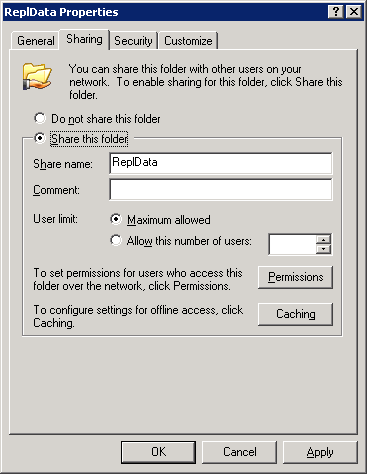
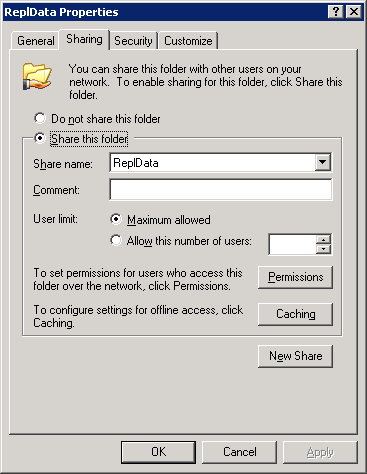
  • Share this folder by right clicking the folder and clicking Properties
  • Click Sharing tab

  • Click Share this folder
  • In the Share this folder field, check that the name ReplData is entered (Save this name for later)
  • Click Apply
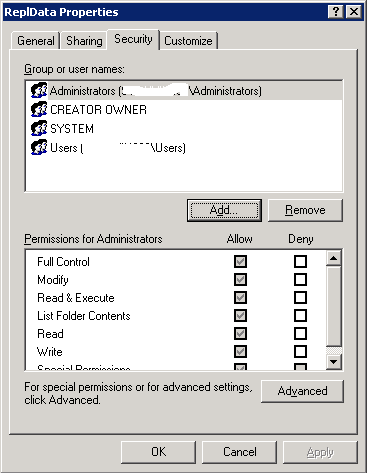
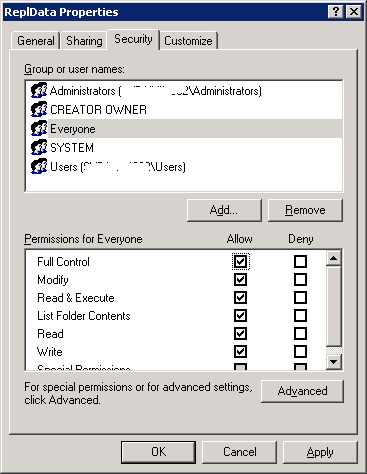
  • Click the Security tab

  • Click Add

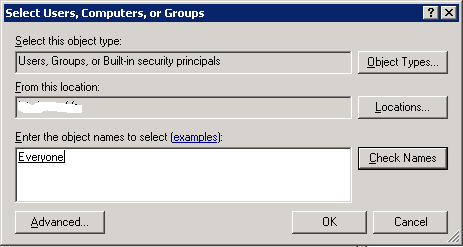
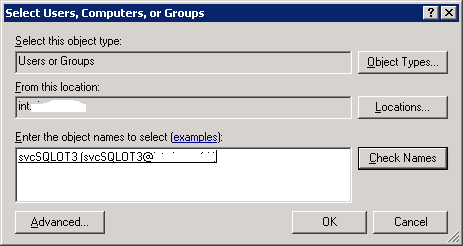
  • In Enter the object names to select, enter everyone
  • Click Check Names
  • Click OK

  • In Group or user names, click Everyone
  • In Permissions for Everyone, click Allow for Full Control
  • Click OK

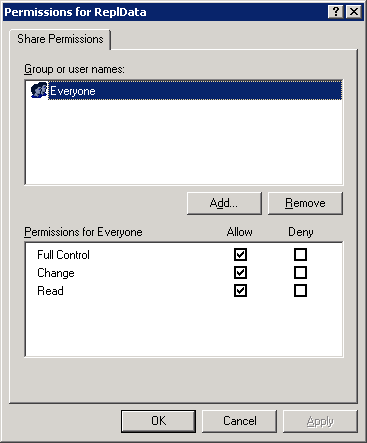
Check sharing permissions

  • Click Permissions

  • Click Everyone
  • Click Allow for Full Control
  • Click OK
  • Click OK


Setting up your Publication

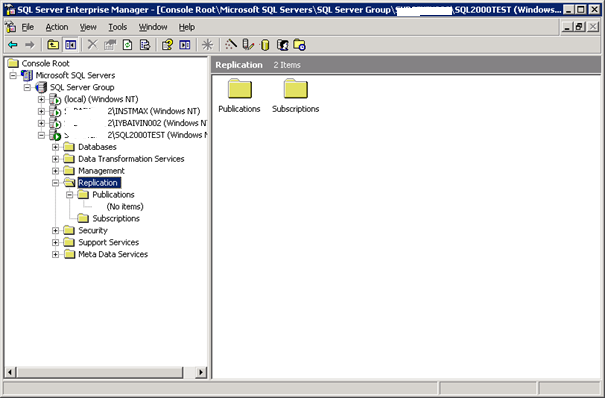
  • Elapse Replication folder
  • Right click on Publications
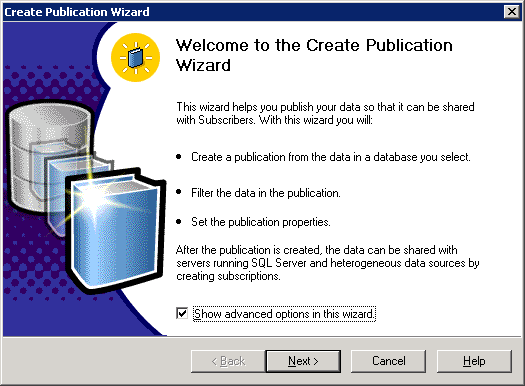
  • Click on New Publication…

  • Click Show advanced options in this wizard
  • Click Next >

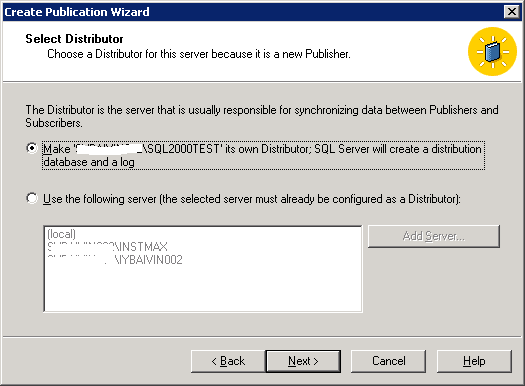
  • Click Make ‘ServerName\InstanceName’ its own Distributor; SQL Server will create a distribution database and log. You can also click the other option to define an other server that will host the distribution database.
  • Click Next >

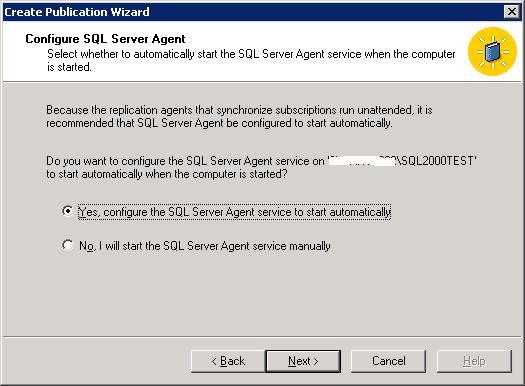
  • Click Yes, configure the SQL Server Agent service to start automatically
  • Click Next >

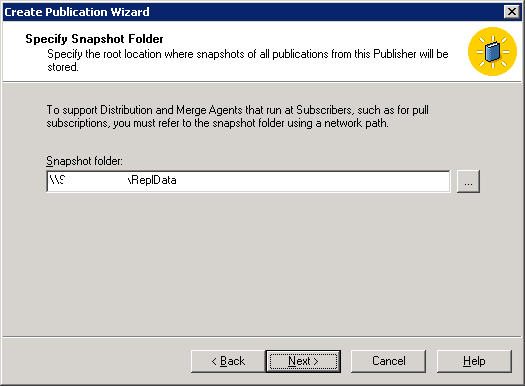
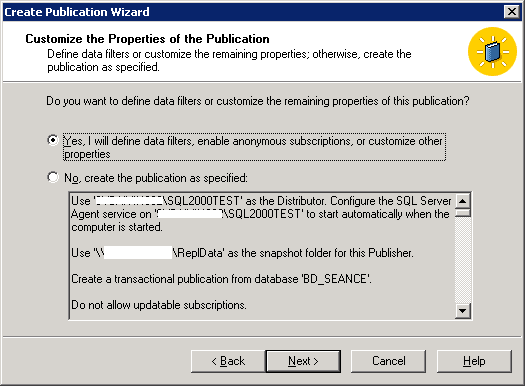
  • Enter a shared folder in the Snapshot folder field. It’s important to set a UNC name, that will be seen from other servers (subscription servers)
  • Click Next >

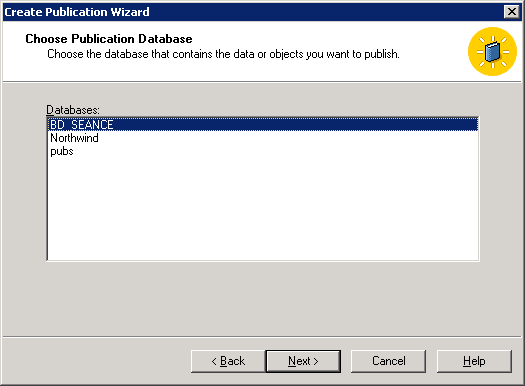
  • Click on the Data base you want to publish
  • Click Next >

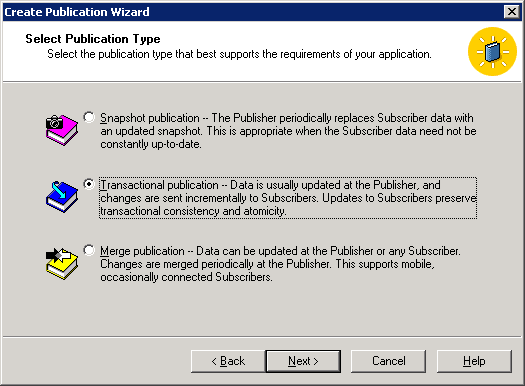
  • Click Transactional publication
  • Click Next >

  • Click Next >

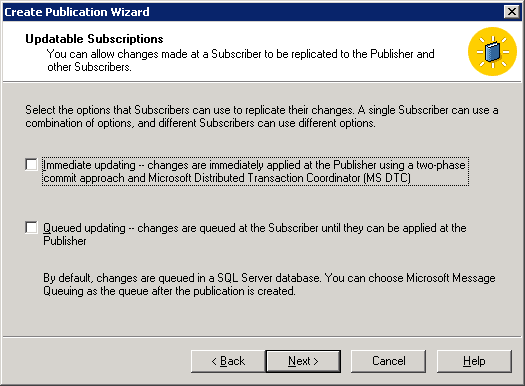
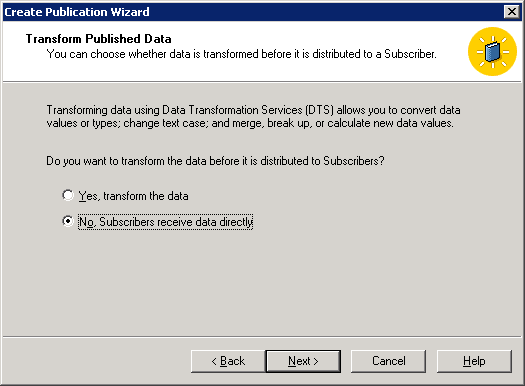
  • Click No, Subscribers receive data directly
  • Click Next >

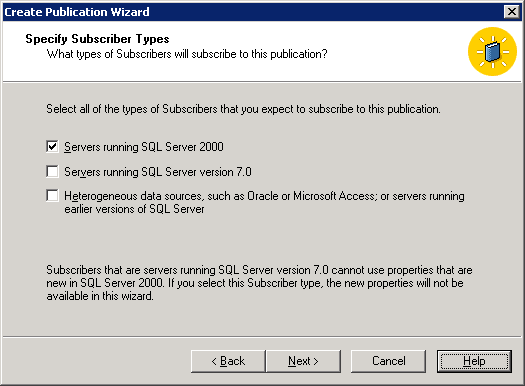
  • Click Servers running SQL Server 2000
  • Click Next >

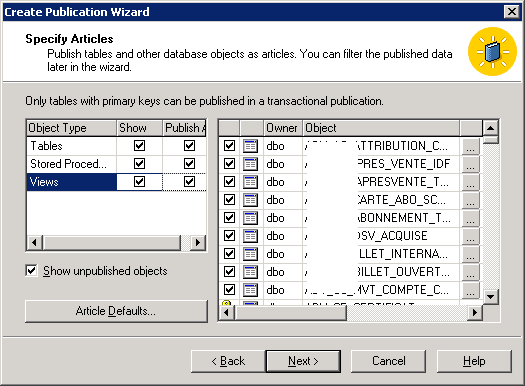
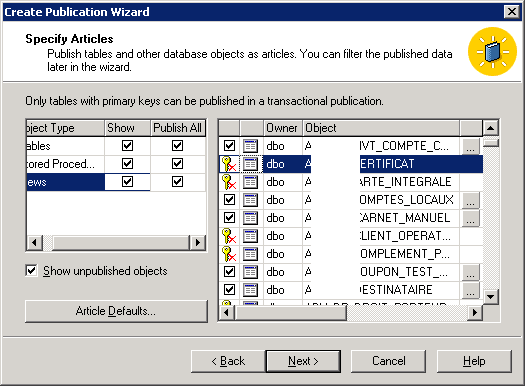
  • Click Show unpublished objects to see whether table have problems or not
  • In object type, click Show and Publish All to select and publish all the articles by object type (you can either check all or one by one the articles)
  • Click on Next >
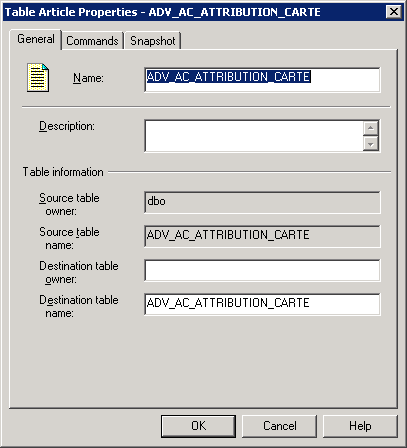
  • You can click on in front of an article to set a different owner on the target table

Exception for articles with no Primary Keys.

These articles symbolized by a stroked key and not by a check, will not be published because they don’t have primary key. You can anyway publish the other articles, and make modification to set a primary key in your database and republish these modified articles later.

  • Click Next >

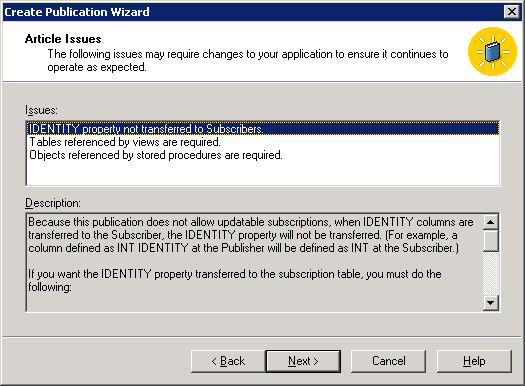
  • In the Issues list, select each item in order to view what kind of potential issues you can have.
  • Click on Next >

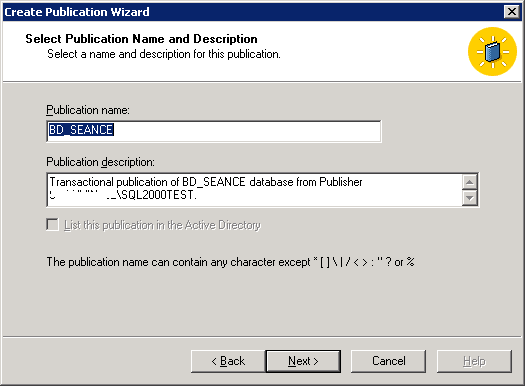
  • In Publication name field, enter a name for the publication (this name will appear under Publications folder in SQL Server
  • Click on Next >

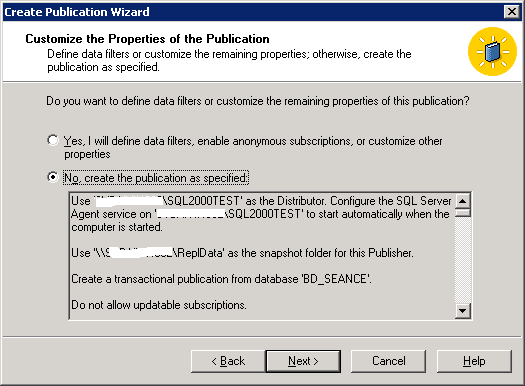
  • Click Next >

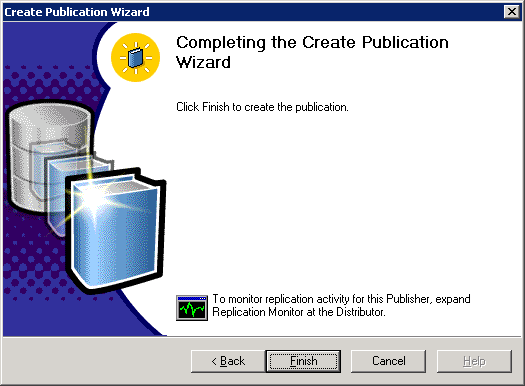
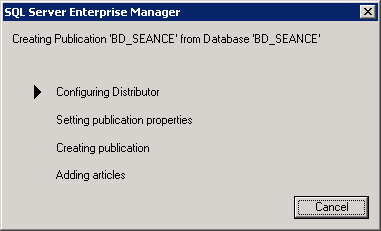
  • Click Finish

Troubleshooting

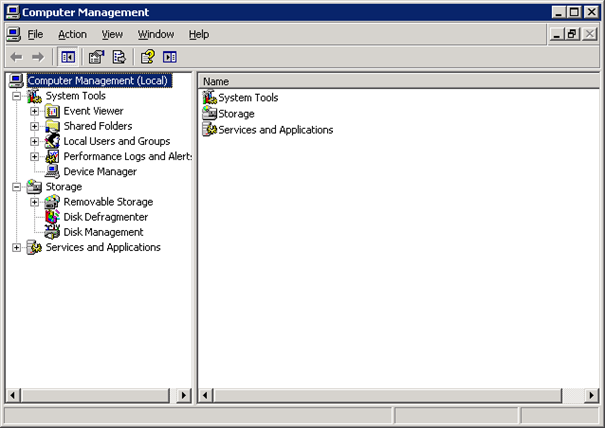
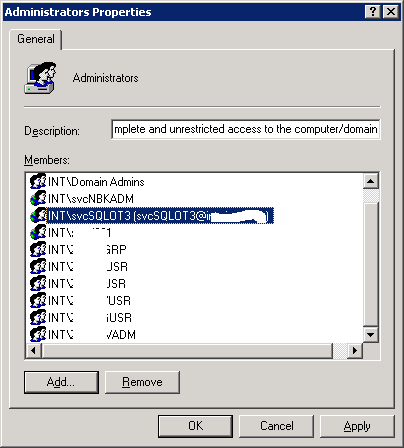
  • Click Start / Administrative tools / Computer management

  • Expand Local Users and Groups
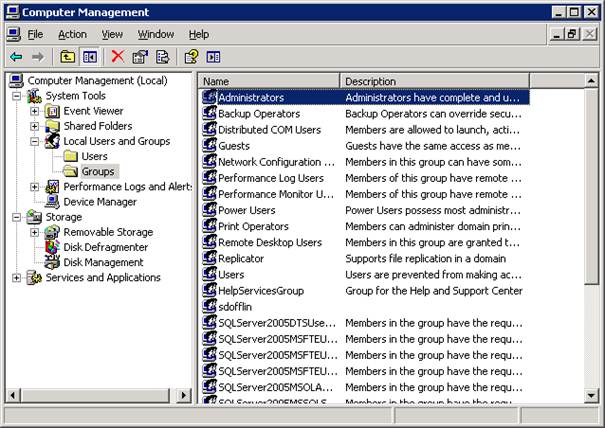
  • Click Groups

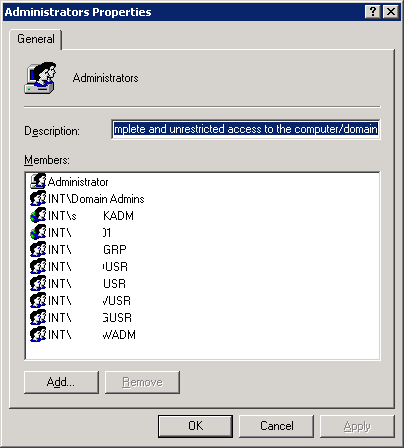
  • Double click Administrators

  • Click Add

  • Type the account used for your SQL Agent service
  • Click Check Names
  • Click OK

  • Click OK

Publication Properties

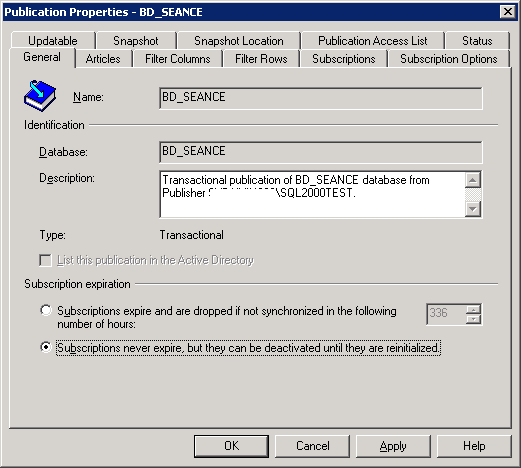
  • Click Subscriptions never expire… in order to avoid the subscriber to be dropped in any kind long issue

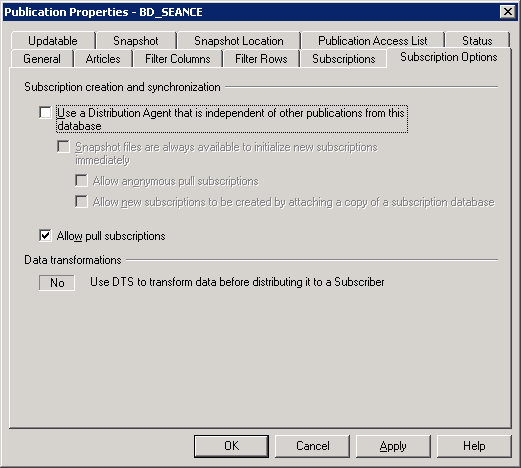
  • Verify that Allow pull subscriptions is checked
  • Click Snapshot tab

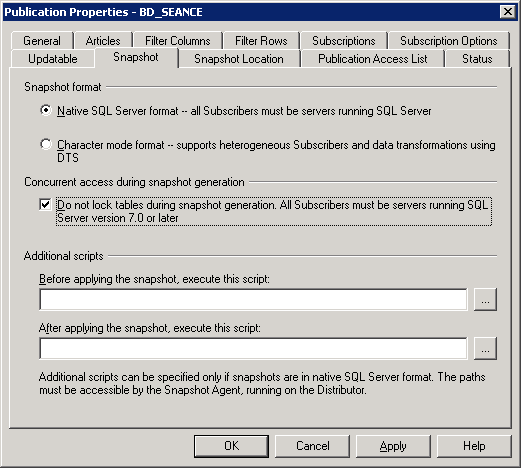
  • Check Do not lock tables during snapshot… in order to avoid any issue if the snapshot is made during a batch or long insert / update operation on the source database
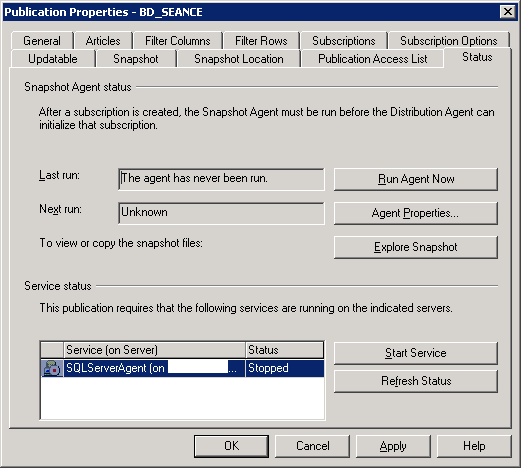
  • Click Status tab

  • Click Start Service if the SQL Server Agent is not running (see troubleshoot section in case)
  • Click OK

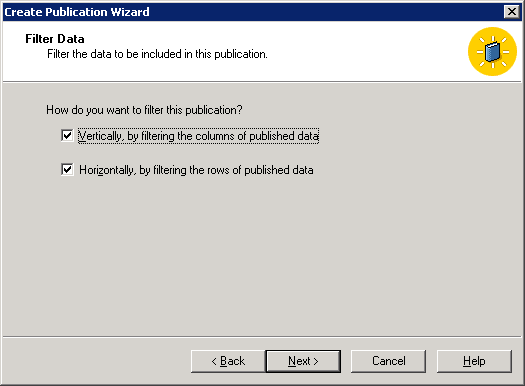
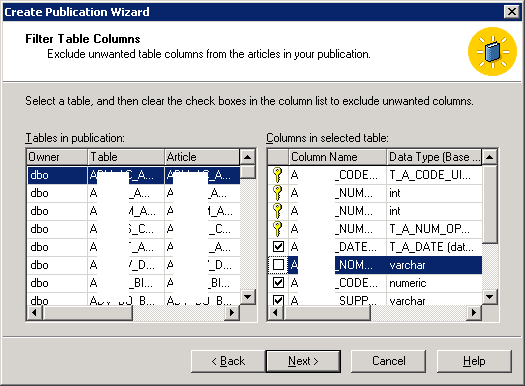
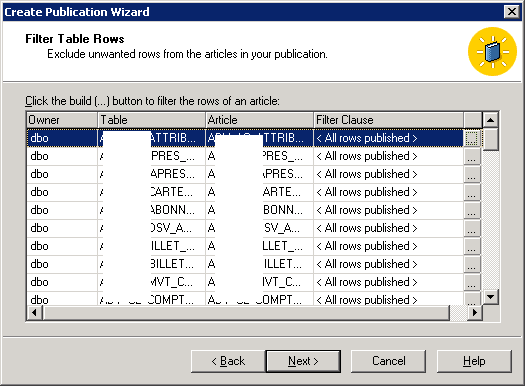
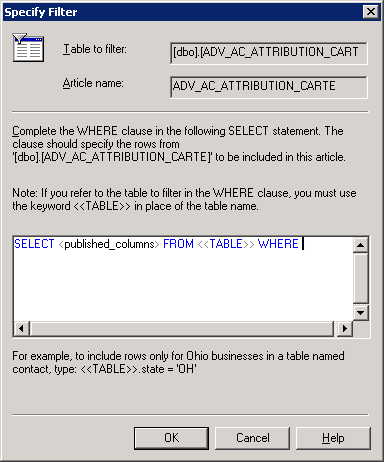
Defining data filters

      Colum filters    
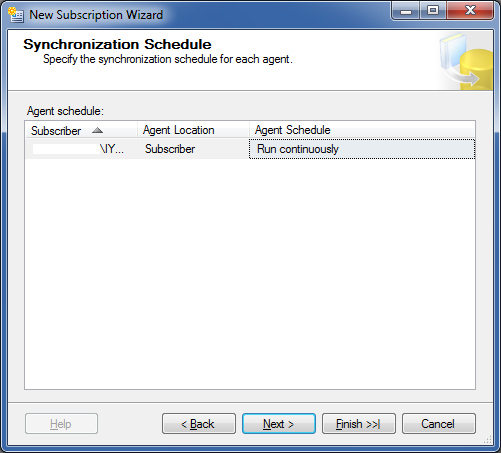
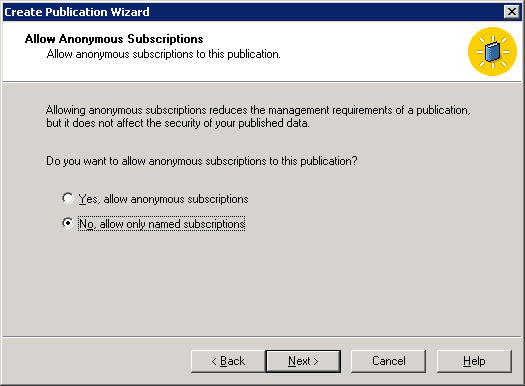
How to set the subscriber (SQL Server 2008R2)

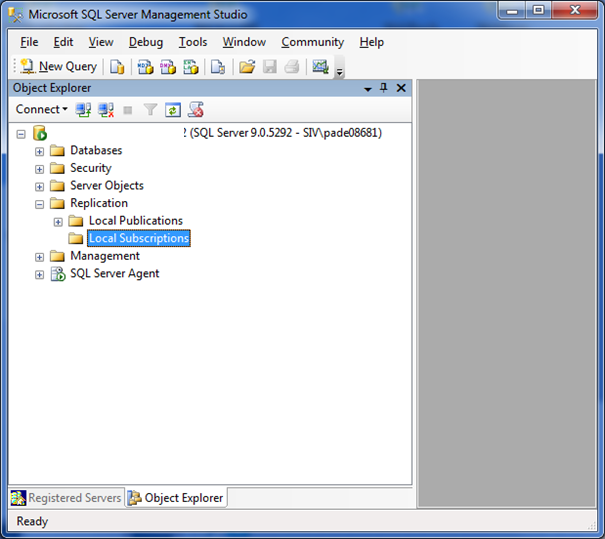
  • Elapse Replication folder
  • Right click on Local Subscriptions
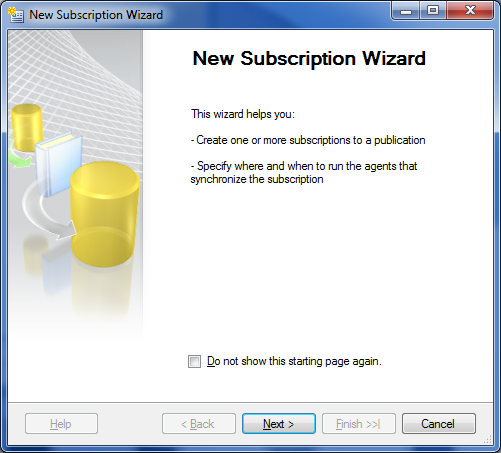
  • Click New Subscriptions…

  • Click Next >

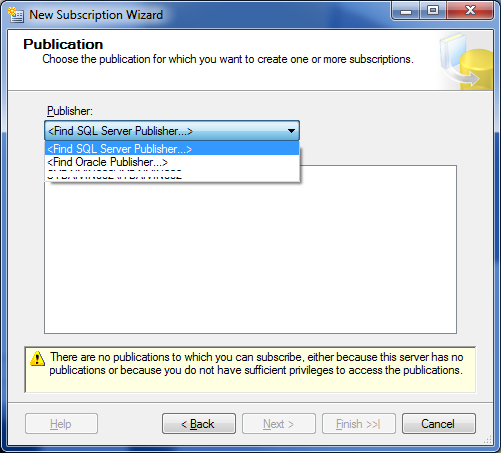
  • Click <Find SQL Server Publisher…>

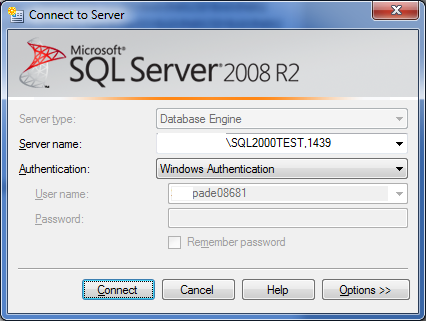
  • Click Connect

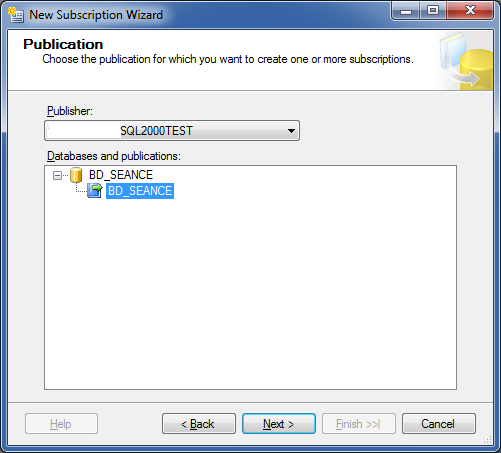
  • Select the database you want to subscribe to.
  • Click Next >

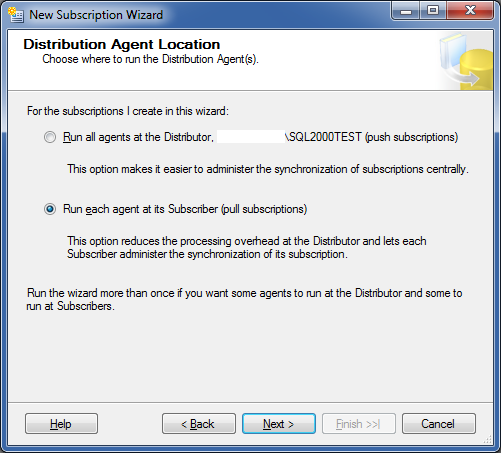
  • Click Run each agent at its Subscriber (pull subscriptions)
  • Click Next >

I made the choice of using pull subscription, just to avoid to add more activity on the server you want to migrate. These old servers are usually on production systems and really sensible (the clients often refuse to touch something that works, and…they are right!)

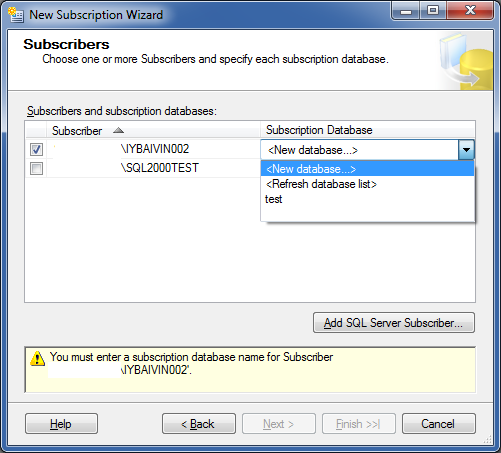
  • Select the subscriber server
  • Click <New database…>

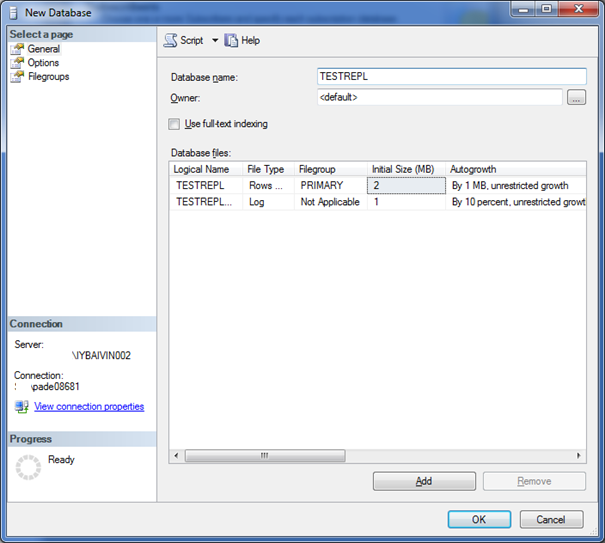
  • In Database name field, enter the name of the new database
  • Set all the parameters you want about the new database (logs,filegroups,…)
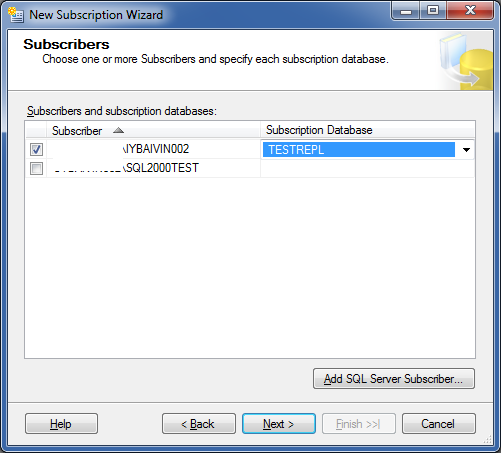
  • Click OK

  • Click Next >

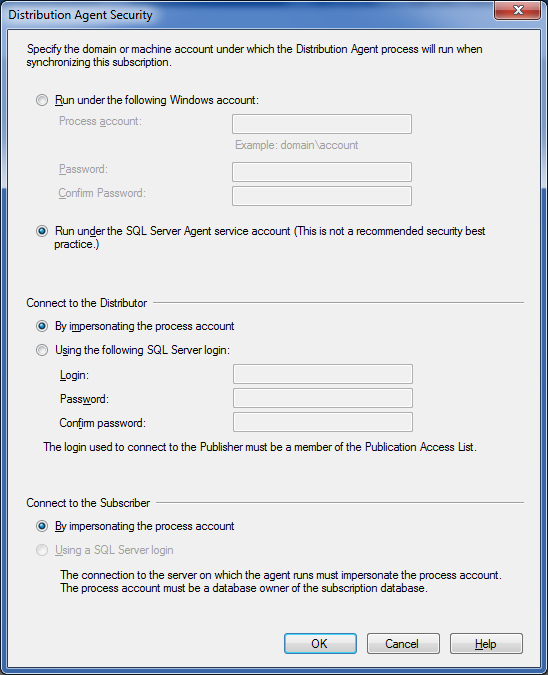
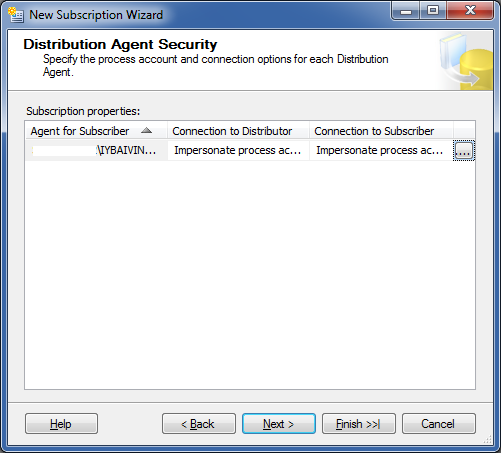
  • Click

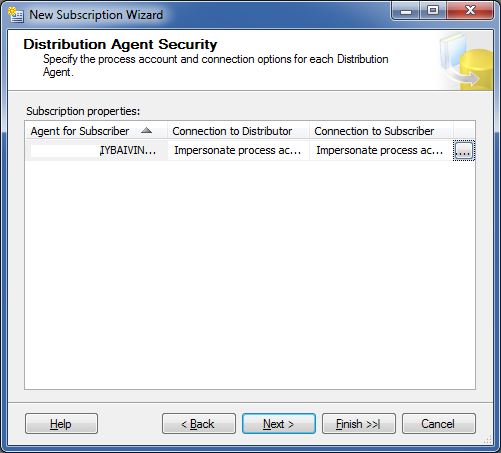
  • Click Run under the SQL Server Agent service account
  • In Connect to the Distributor panel, click By impersonating the process account
  • In Connect to the Subscriber panel, click By impersonating the process account
  • Click OK

  • Click Next >

  • Click Next >

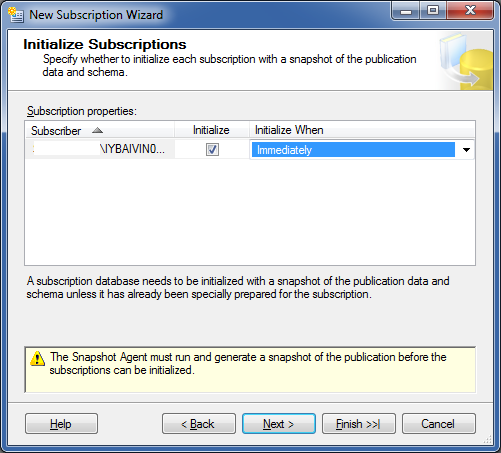
  • Check Initialize
  • In Initalize When, select Immediately
  • Click Next >

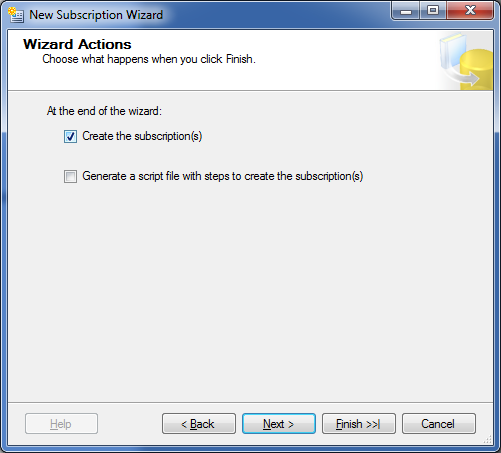
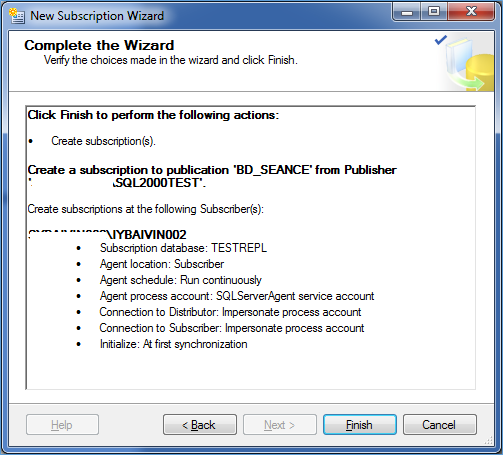
  • Check Create the subscription(s)
  • Click Next >

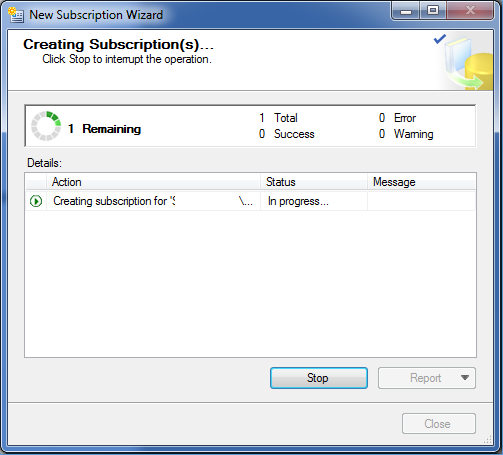
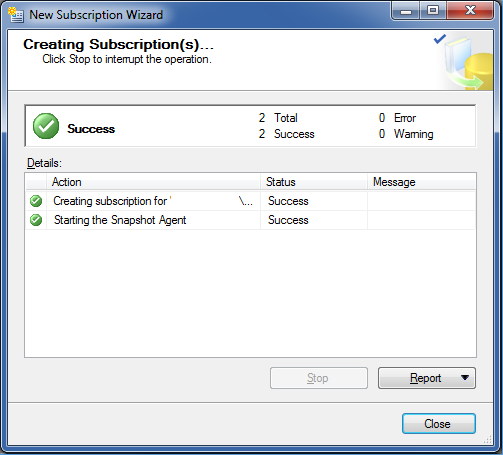
  • Click Finish

  • Click Close


POC Validation


Compatibility mode

In the database properties, you can check the collation elements and compatibility mode

  • The target database under SQL Server 2008R2 has a 100 compatibility mode
  • The database collation is FRENCH_CI_AS

Collations

On SQL Server, collation is set within 3 levels (Instance, database and field)

  • The source database has a SQL_Latin1_General_CP1_CI_AS collation (database level)
  • The columns of this database were also with a SQL_Latin1_General_CP1_CI_AS collation